Introduction:
This is continuation of my original series SuccessFactors Integrations Beginners Guide and in this blog will show how to create API User to use it in SAP CPI.Also some basic connectivity steps from SAP Cloud Platform Integration Suite- Integration Service
There are multiple ways to create an Technical User and will see simplest way of creating one.
User Creation:
We will take file based approach where we will export existing User Data and using the same temple will be creating new User ID required for our purpose.
Step 1:
Log on to SuccessFactors as Administrator.
Step 2:
Navigate to Admin Center and open Employee Export from Tools Search bar.
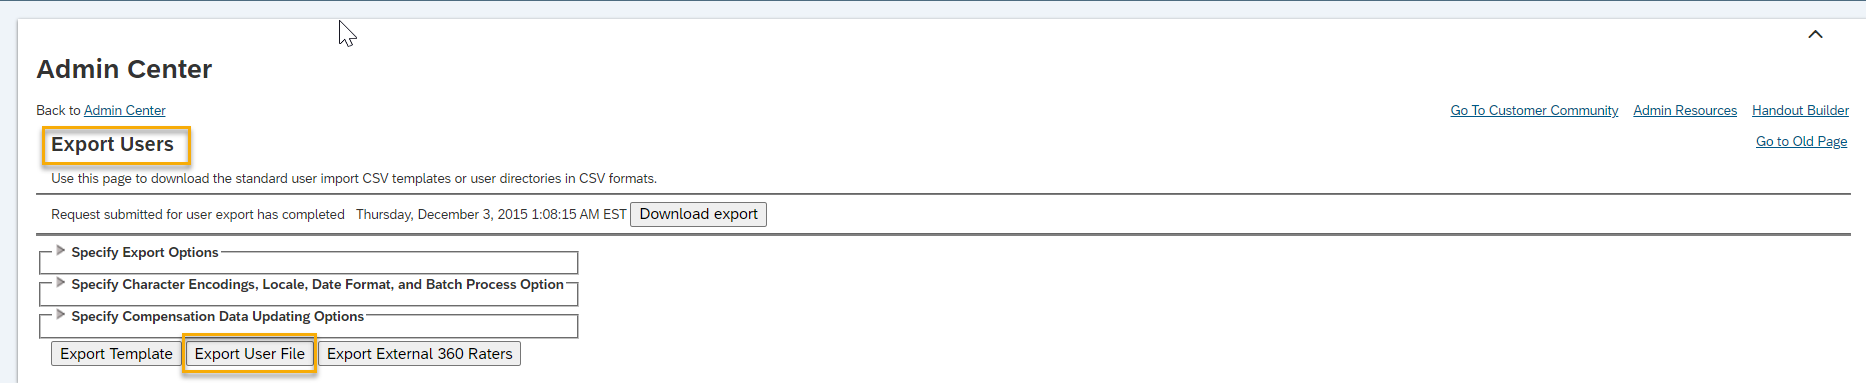
Step 3:
Click on Export User File as shown below to save the CSV file in to your computer.
Step 4:
Remove all rows except the first 2 header rows (the attributes in the fields of the existing users can be references for creating new records). Add rows for the user IDs you require, in our case SF_INT_USER ( below is just an example for reference ) .Save the file with..csv extension.
STATUS,USERID,USERNAME,FIRSTNAME,NICKNAME,MI,LASTNAME,SUFFIX,TITLE,GENDER,EMAIL,MANAGER,HR,DEPARTMENT,JOBCODE,DIVISION,LOCATION,TIMEZONE,HIREDATE,EMPID,BIZ_PHONE,FAX,ADDR1,ADDR2,CITY,STATE,ZIP,COUNTRY,REVIEW_FREQ,LAST_REVIEW_DATE,MATRIX_MANAGER,DEFAULT_LOCALE,PROXY,seatingChart,CUSTOM01,CUSTOM02,CUSTOM03,CUSTOM04,CUSTOM05,CUSTOM06,CUSTOM07,CUSTOM08,CUSTOM09,CUSTOM10,CUSTOM11,CUSTOM12,CUSTOM13,CUSTOM14,CUSTOM15,ONBOARDING_ID,PERSON_GUID,PERSON_ID_EXTERNAL,ASSIGNMENT_ID_EXTERNAL
STATUS,USERID,Username,First Name,Nickname,Middle Name,Last Name,Suffix,Title,Gender,Email,Manager,Human Resource,Department,Job Code,Division,Location,Time Zone,Hire Date,Employee Id,Business Phone,Business Fax,Address Line 1,Address Line 2,City,State,ZIP,Country,Review Frequency,Last Review Date,Matrix Manager,Default Locale,Proxy,null,Customizable Field 1,Customizable Field 2,Customizable Field 3,Customizable Field 4,Customizable Field 5,Customizable Field 6,Customizable Field 7,Customizable Field 8,Customizable Field 9,Customizable Field 10,Customizable Field 11,Customizable Field 12,Customizable Field 13,Customizable Field 14,Customizable Field 15,ONBOARDING_ID,PERSON_GUID,PERSON_ID_EXTERNAL,Assignment ID
active,SF_INT_USER,SF_INT_USER,SF_INT_USER,,,Administrator,,,M,SF_INT_USER@bestrun.com,NO_MANAGER,NO_HR,N/A,,N/A,N/A,US/Eastern,,SF_INT_USER,,,,,,,,,,,,en_US,sfadmin,,,,,,,,,,,,,,,,,,62D49D9DB4614877ABB8CCF28C954T62,SF_INT_USER,SF_INT_USER
Step 5:
Go Back to Admin Center and open Import Employee Data from Tools Search
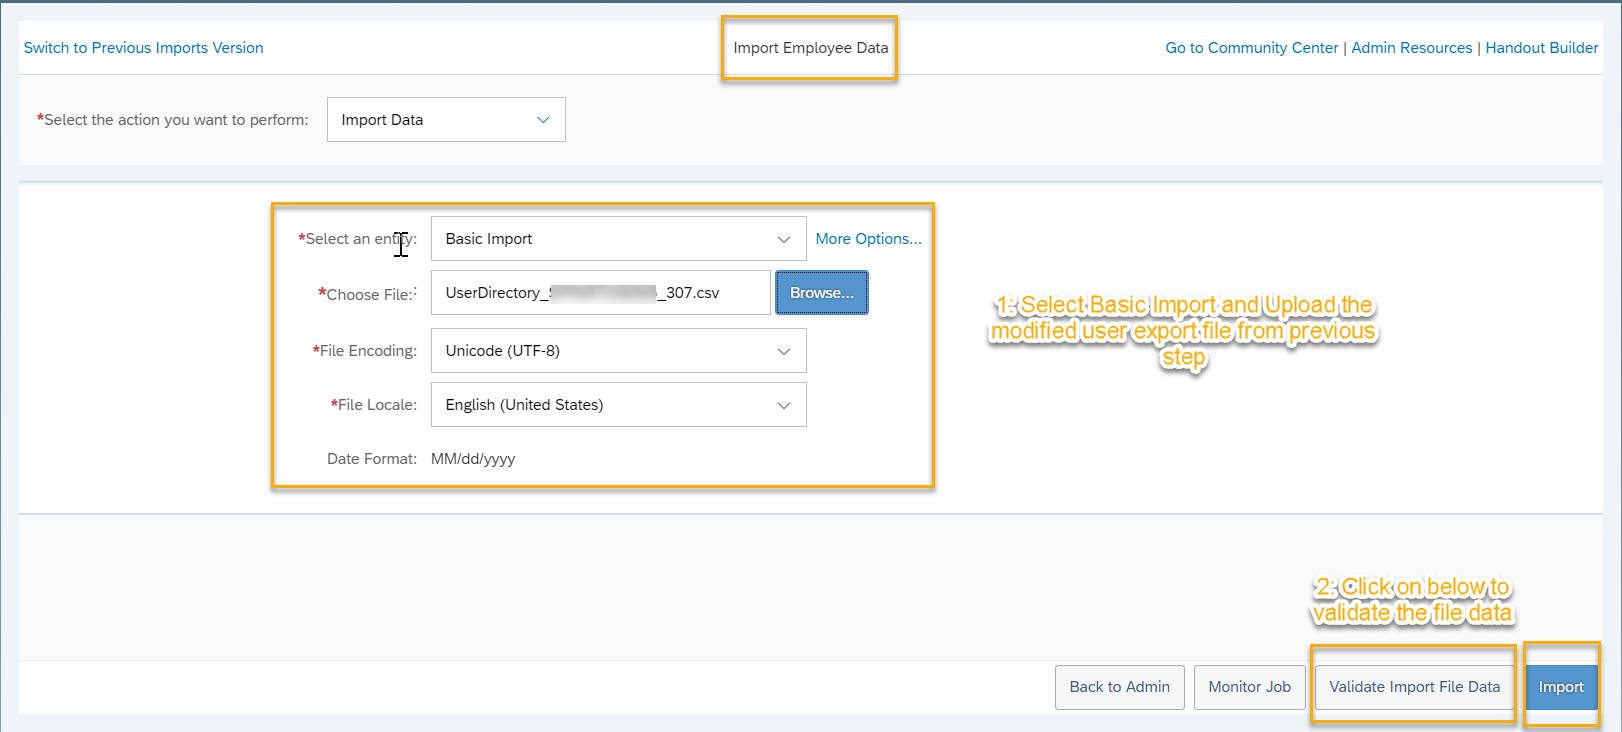
Step 6:
Select Basic Import from drop down followed by selecting the CSV file from your desktop.Click on Validate Import File Data.
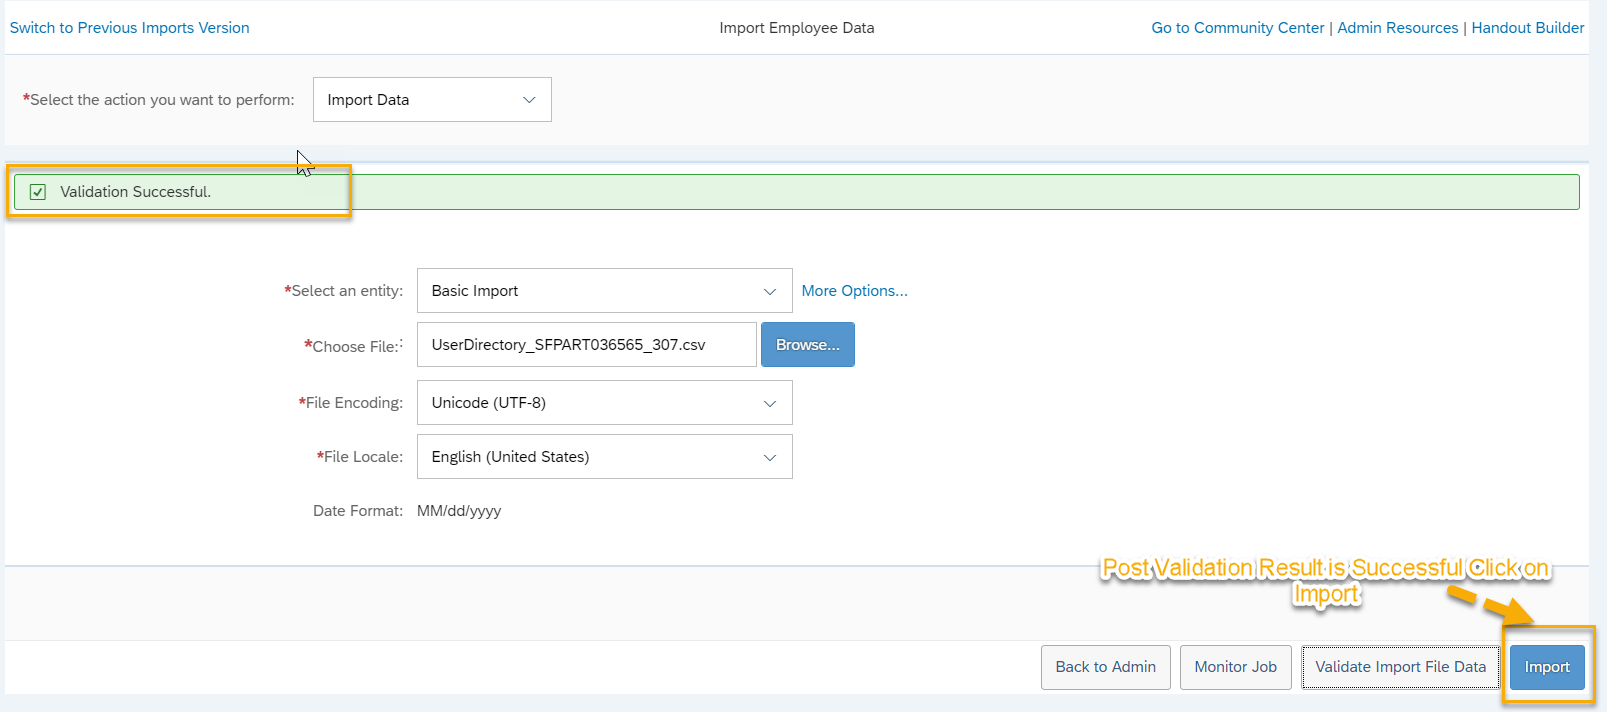
Step 6:
You should receive Validation Successful message like below and then proceed Importing by clicking Import
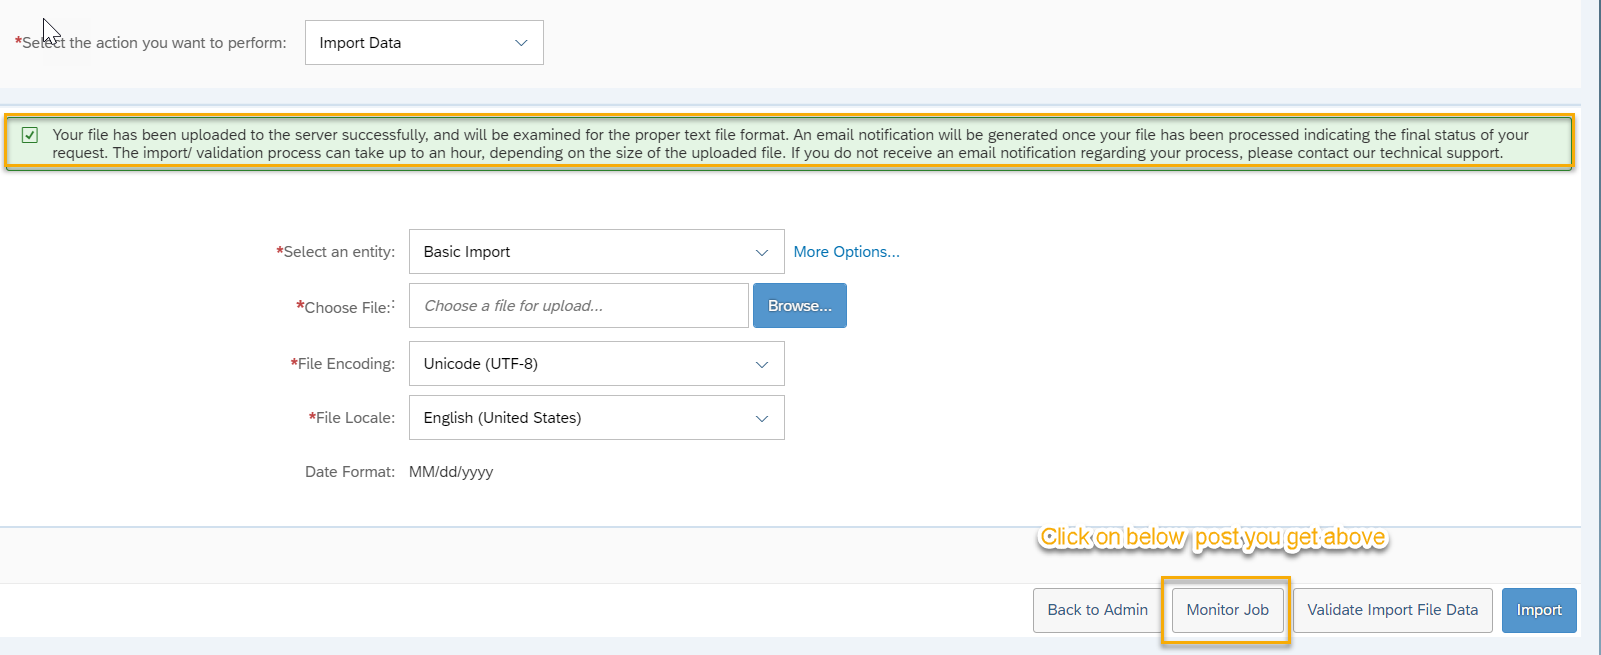
Step 7:
You will get a notification something like below once File Is uploaded to Server.Usually it triggers background job to update the data into SFSF.Click on Monitor Job to see status of the User Import Job
Step 8:
Look for the job you have created and if status is completed then we are good to with further steps.

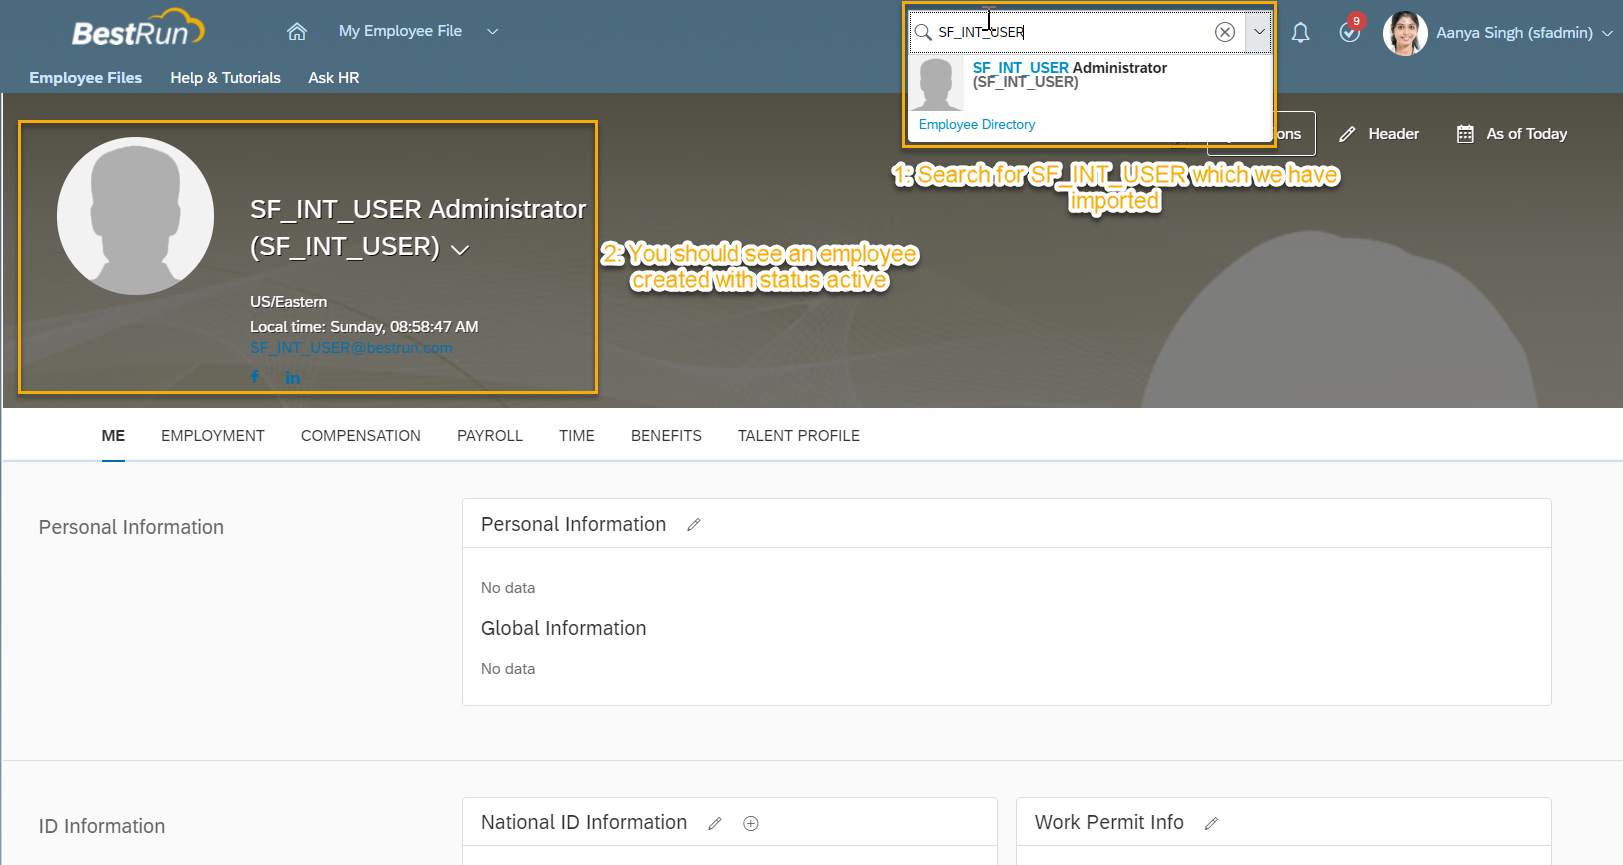
Step 9:
Go back to Home Page and search for the new user created to make sure our user created successfully.
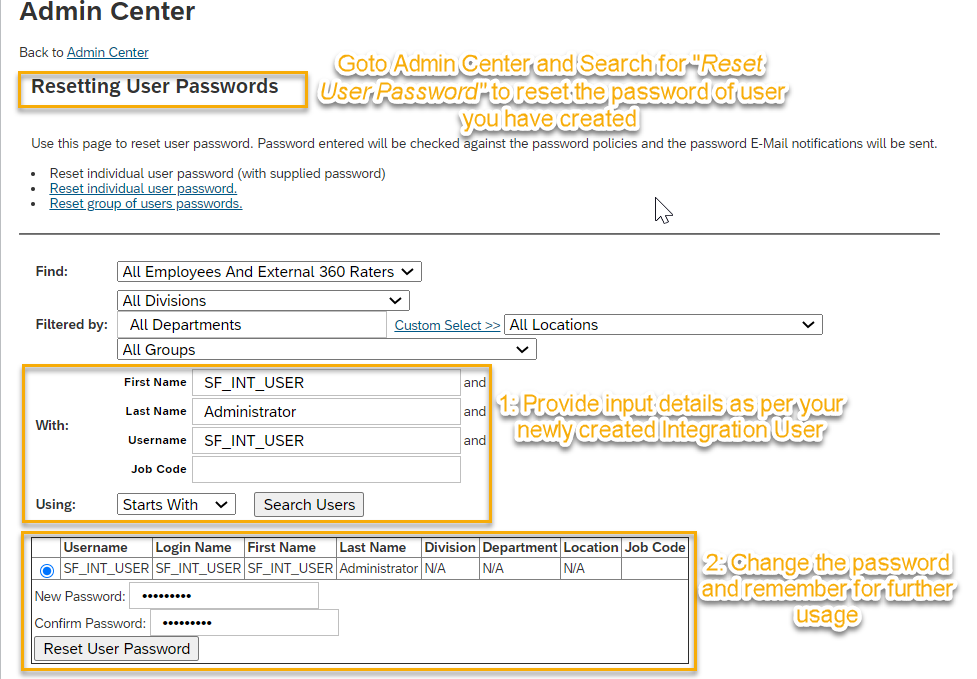
Step 10:
Reset the password to new which can be referenced in SAP CPI while creating Security Artifact.Navigate to Admin Center and search for Reset User Password to set new password.
Now we have created User Successfully in SuccessFactors.
Maintain Permission Groups:
Navigate to Admin Center and search for Manage Permission Groups to Create new Permission Group for API User.
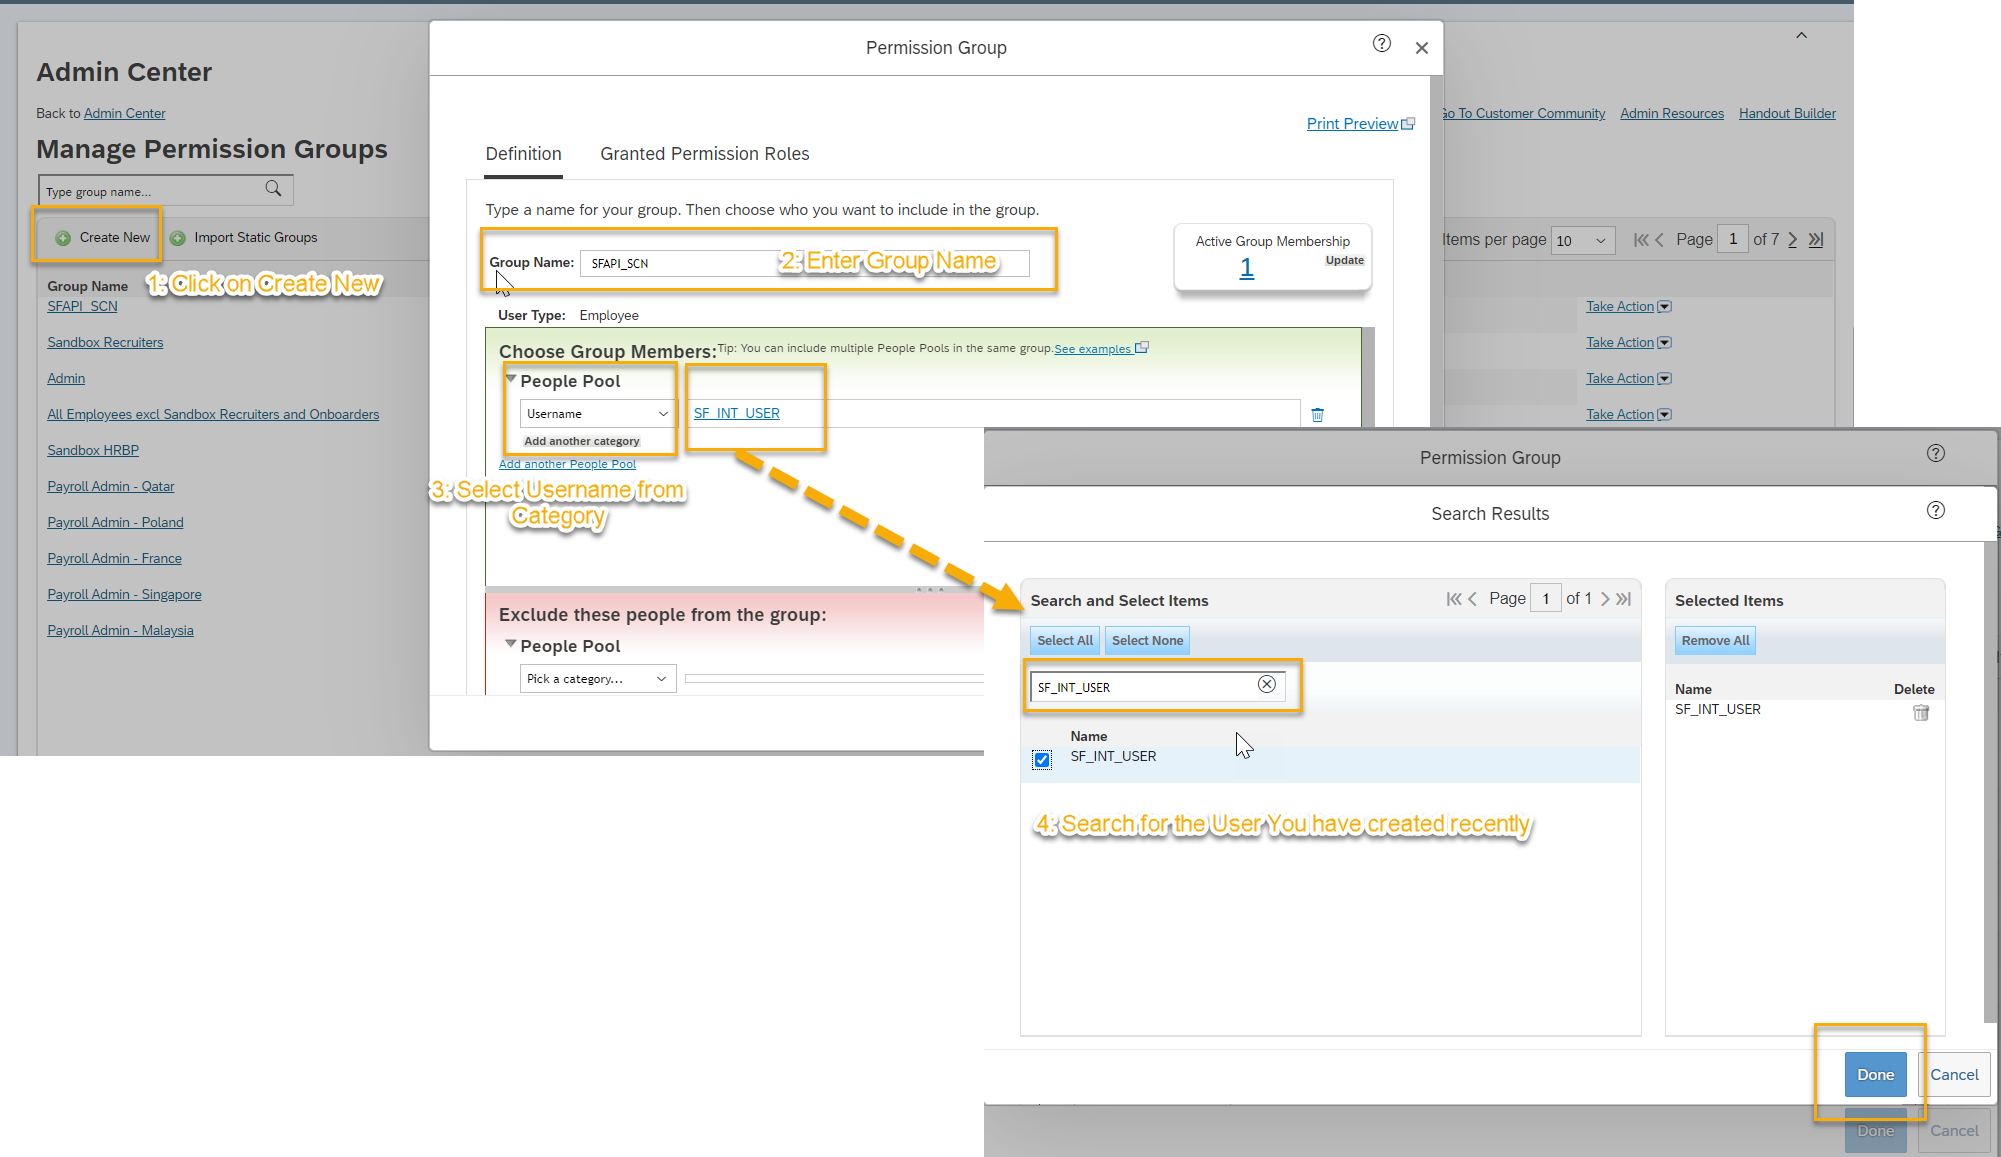
Now you have Permission Group with name SFAPI_SCN created having user id SF_INT_USER assigned to it.
Maintain Permission Roles
Navigate to Admin Center and search for Manage Permission Roles to Create new Permission Role to grant security access to the SAP API user ID created.

Add new role and follow below instruction shown in screenshot.
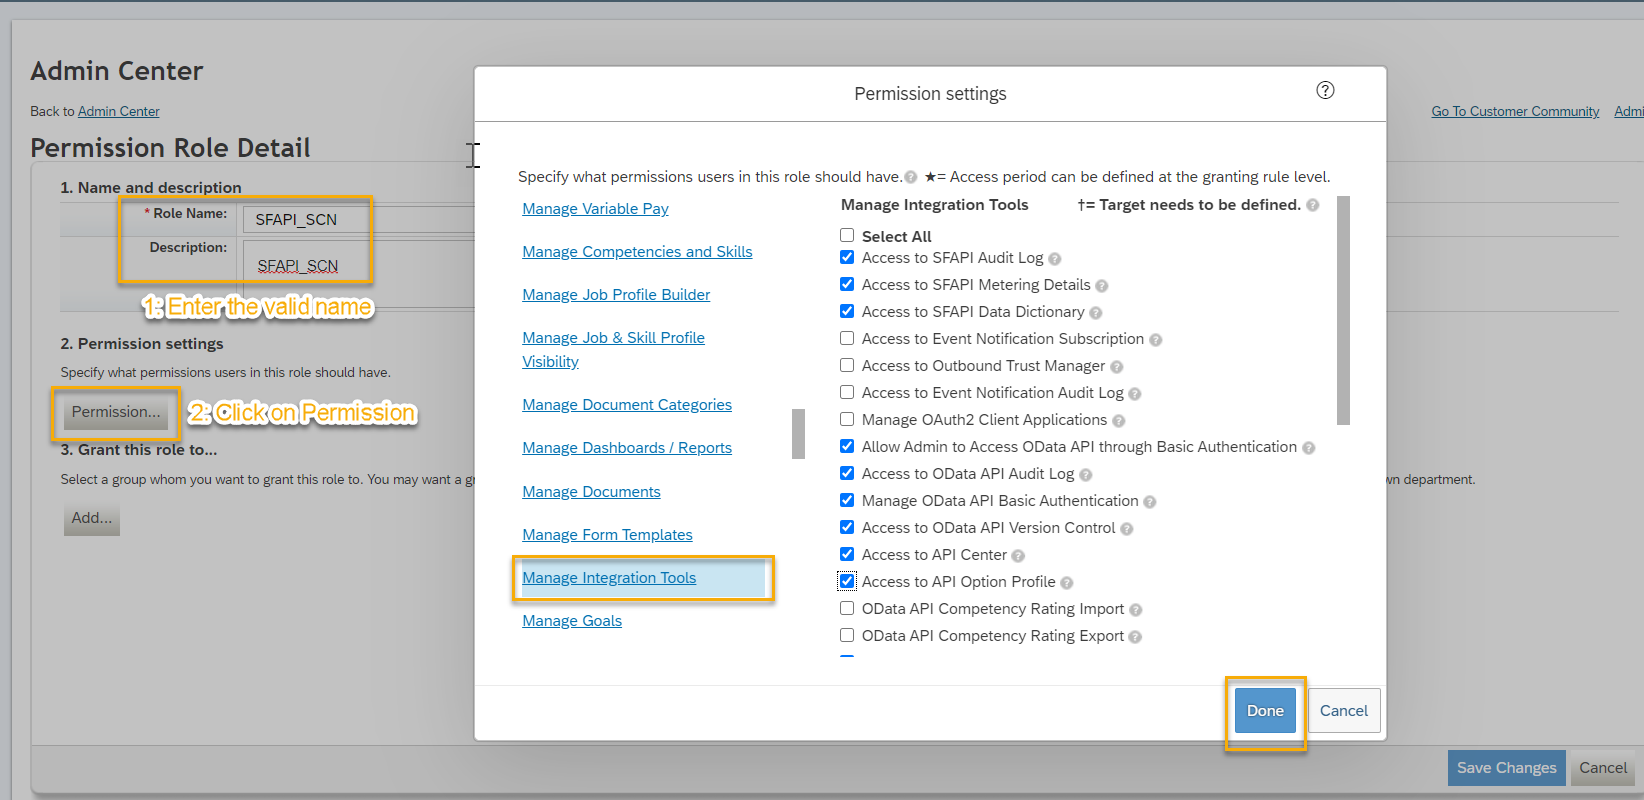
In the above screenshot i have shown only roles related Manage Integration Tools.Please make sure below set of roles also needs to be assigned.
General User Permission –
- SFAPI User Login
Manage Integration Tools –
Select the following:
- Admin access to OData API
- Access to SFAPI Audit Log
- Access to SFAPI Metering Details
- Access to SFAPI Data Dictionary
- Access to OData API Metadata Refresh and Export
Employee Central API –
Select the following:
- Employee Central Foundation SOAP API
- Employee Central HRIS SOAP API
- Employee Central Foundation OData API (read-only)
- Employee Central HRIS OData API (read-only)
- Employee Central Foundation OData API (editable)
- Employee Central HRIS OData API (editable)
Metadata Framework –
Select the following:
- Read/Write Permission on Metadata Framework
- Import Permission on Metadata Framework
Manage User –
Select the following:
- Employee Export
Assign the newly created Permission Role to previously created Permission Group
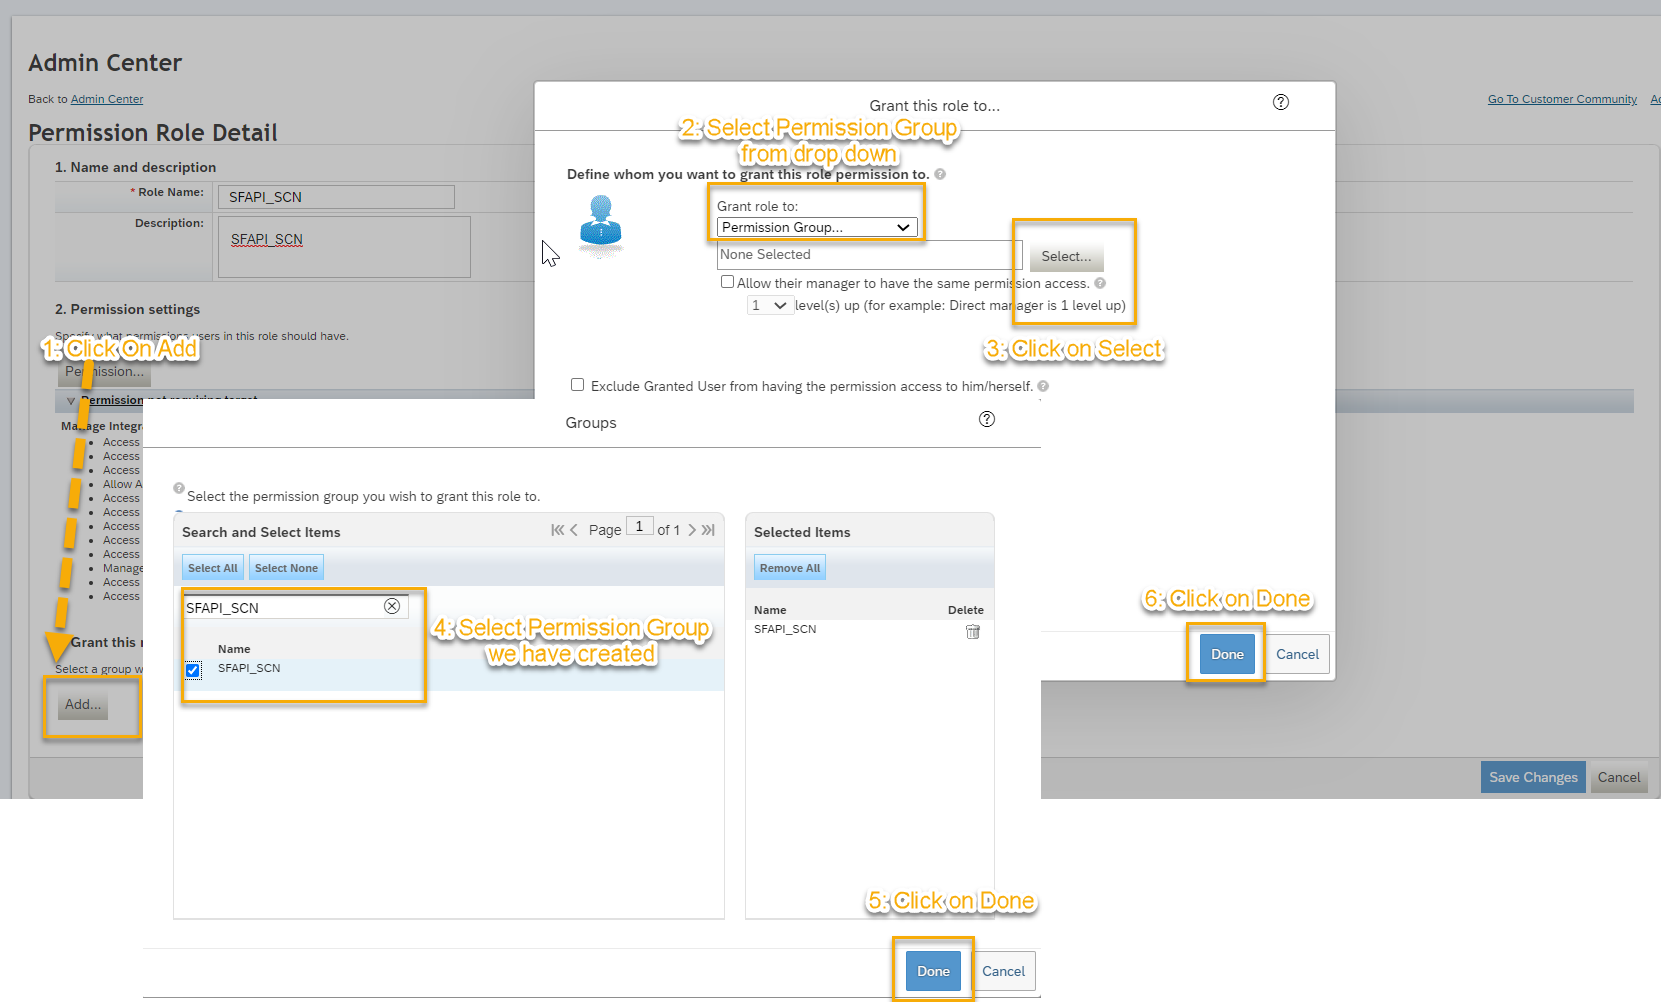
Once done you should see below screen .Then Click on Make it active and make sure you have made selection to Permission Group.

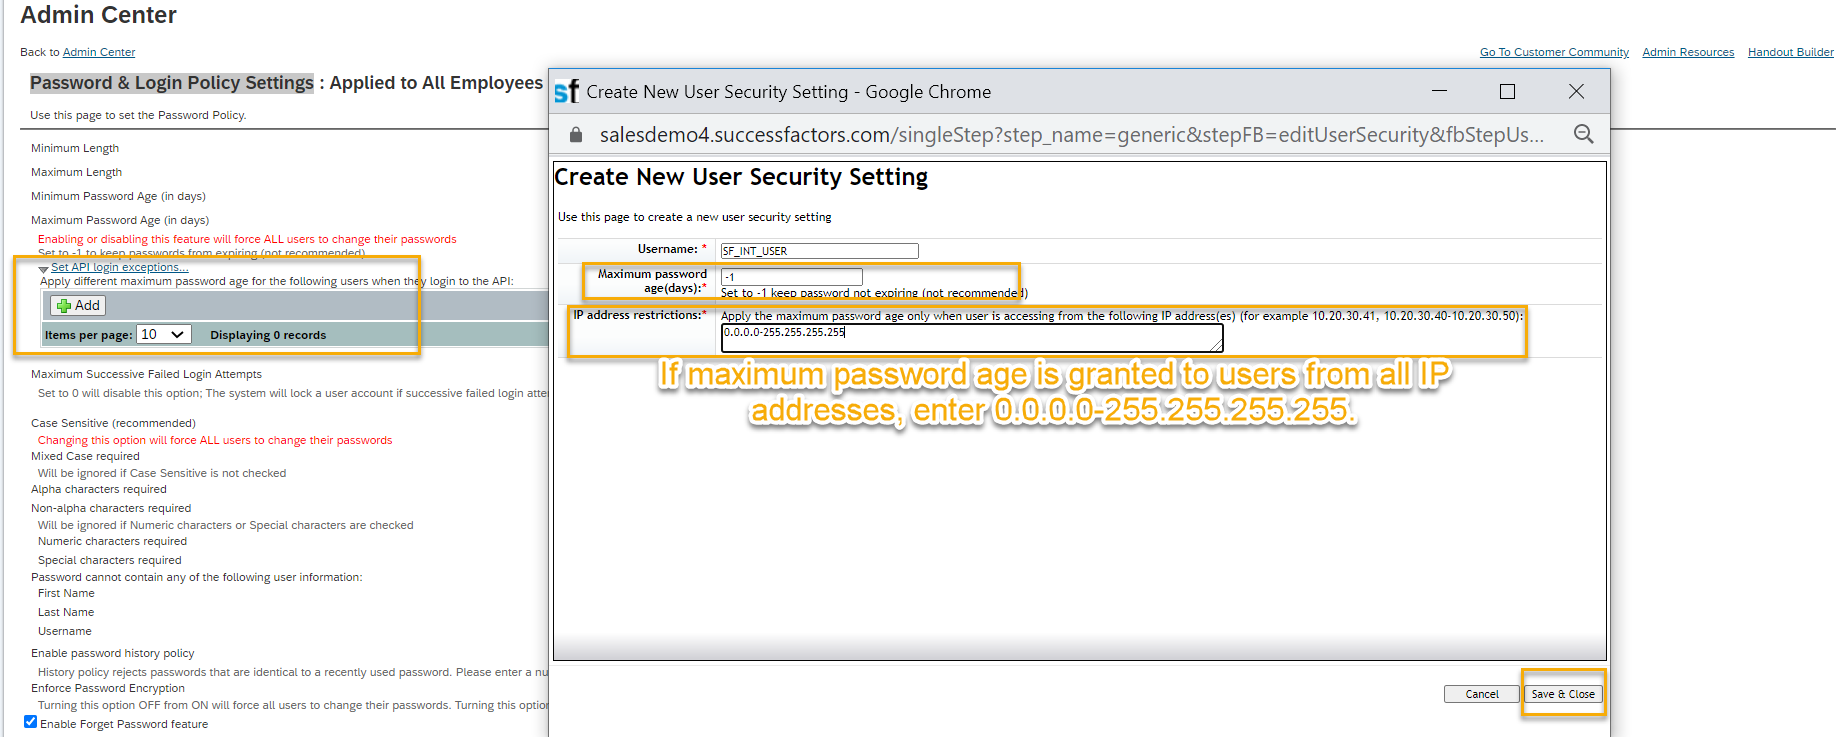
Set API Login Exceptions
Navigate to Admin Center and search for Password & Login Policy Settings to make password non expiring for API user and Set IP Address Restrictions for API Users.
Now we are good to use this user in SAP Cloud Platform Integration Suite- Integration Service.
SAP Cloud Platform Integration Suite- Integration Service Configuration
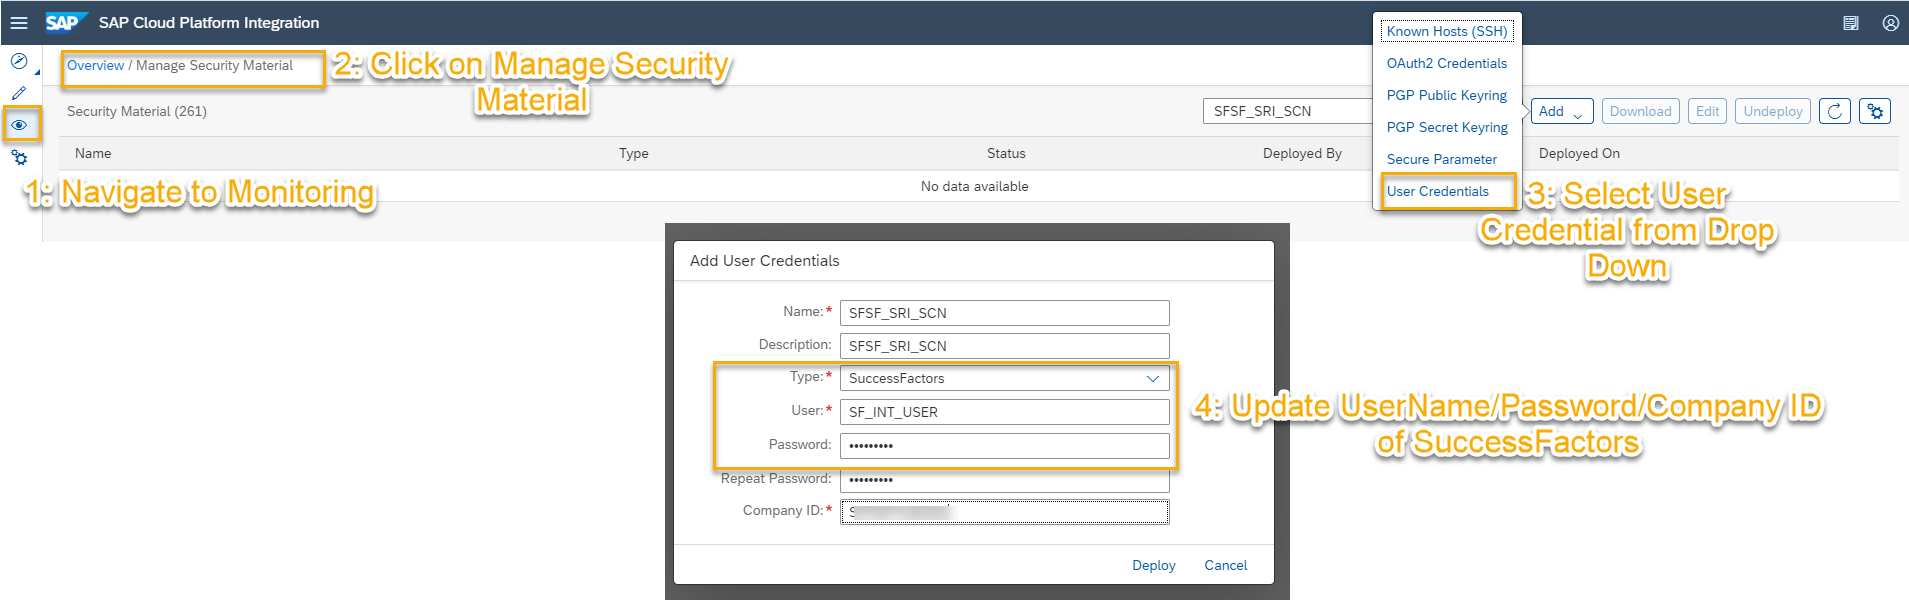
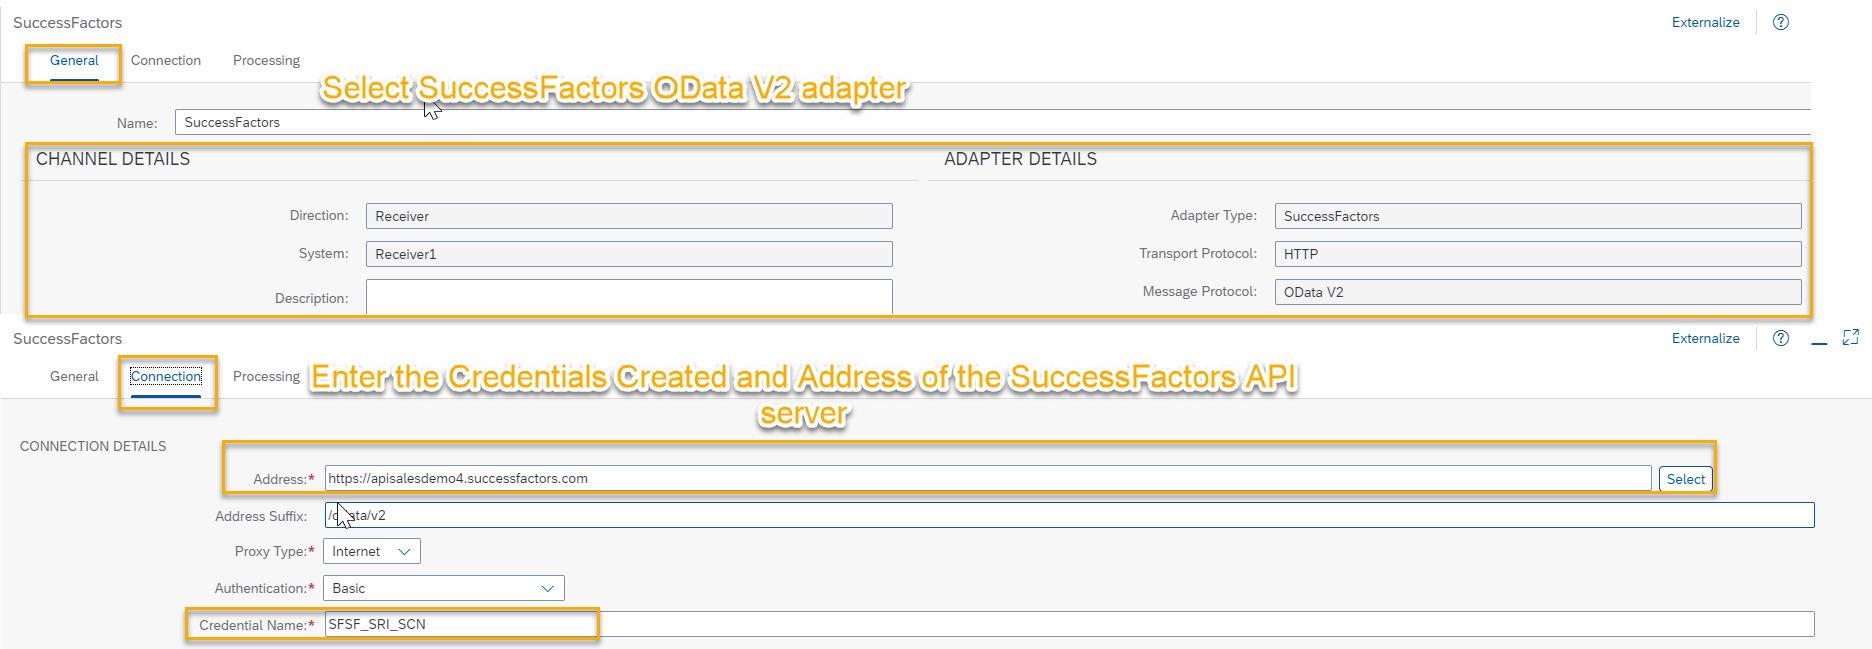
Login into SAP CPI tenant and navigate to Monitoring –> Manage Security Material to create a credential that is later used in SuccessFactors OData V2 adapter.
Create a simple IFlow to get the records from SuccessFactors.
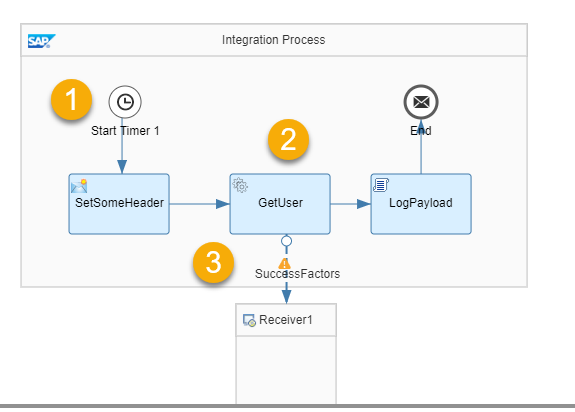
Step 1: Add Timer Event to run the IFlow whenever IFlow gets deployed.
Step 2: Add Request Reply from Pallet.
Step 3:Configure the SuccessFactors OData V2 channel ( you can use SuccessFactors SOAP for Compound Employee API ). API Server Address can be identified using SAP HELP Documentation.
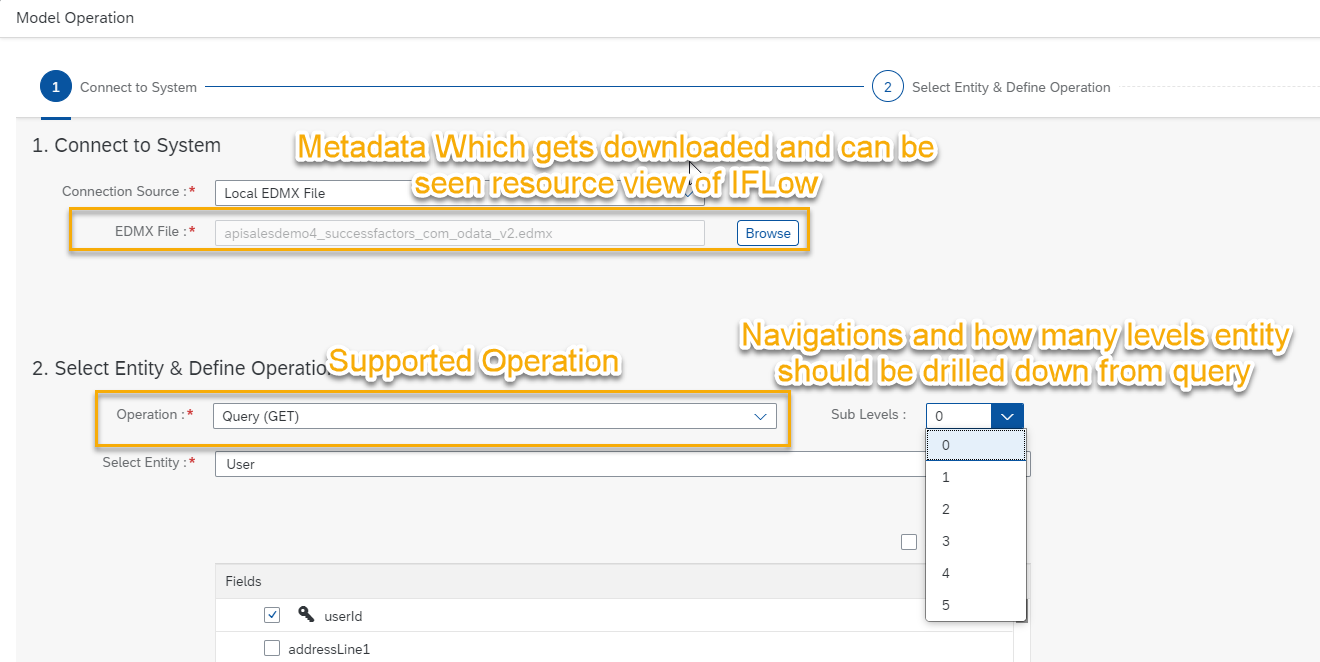
Navigate to next tab Processing and click on Select Button next to Resource.There are 3 parts while forming the query
- Connect to System- Where you will input Credential and password to get the EDMX ( metadata ) file loaded to SAP CPI
- Select Entity and Define Operations: Where Operation,Entity ,Fields and Navigation levels for the entity are selected to form initial part of query .
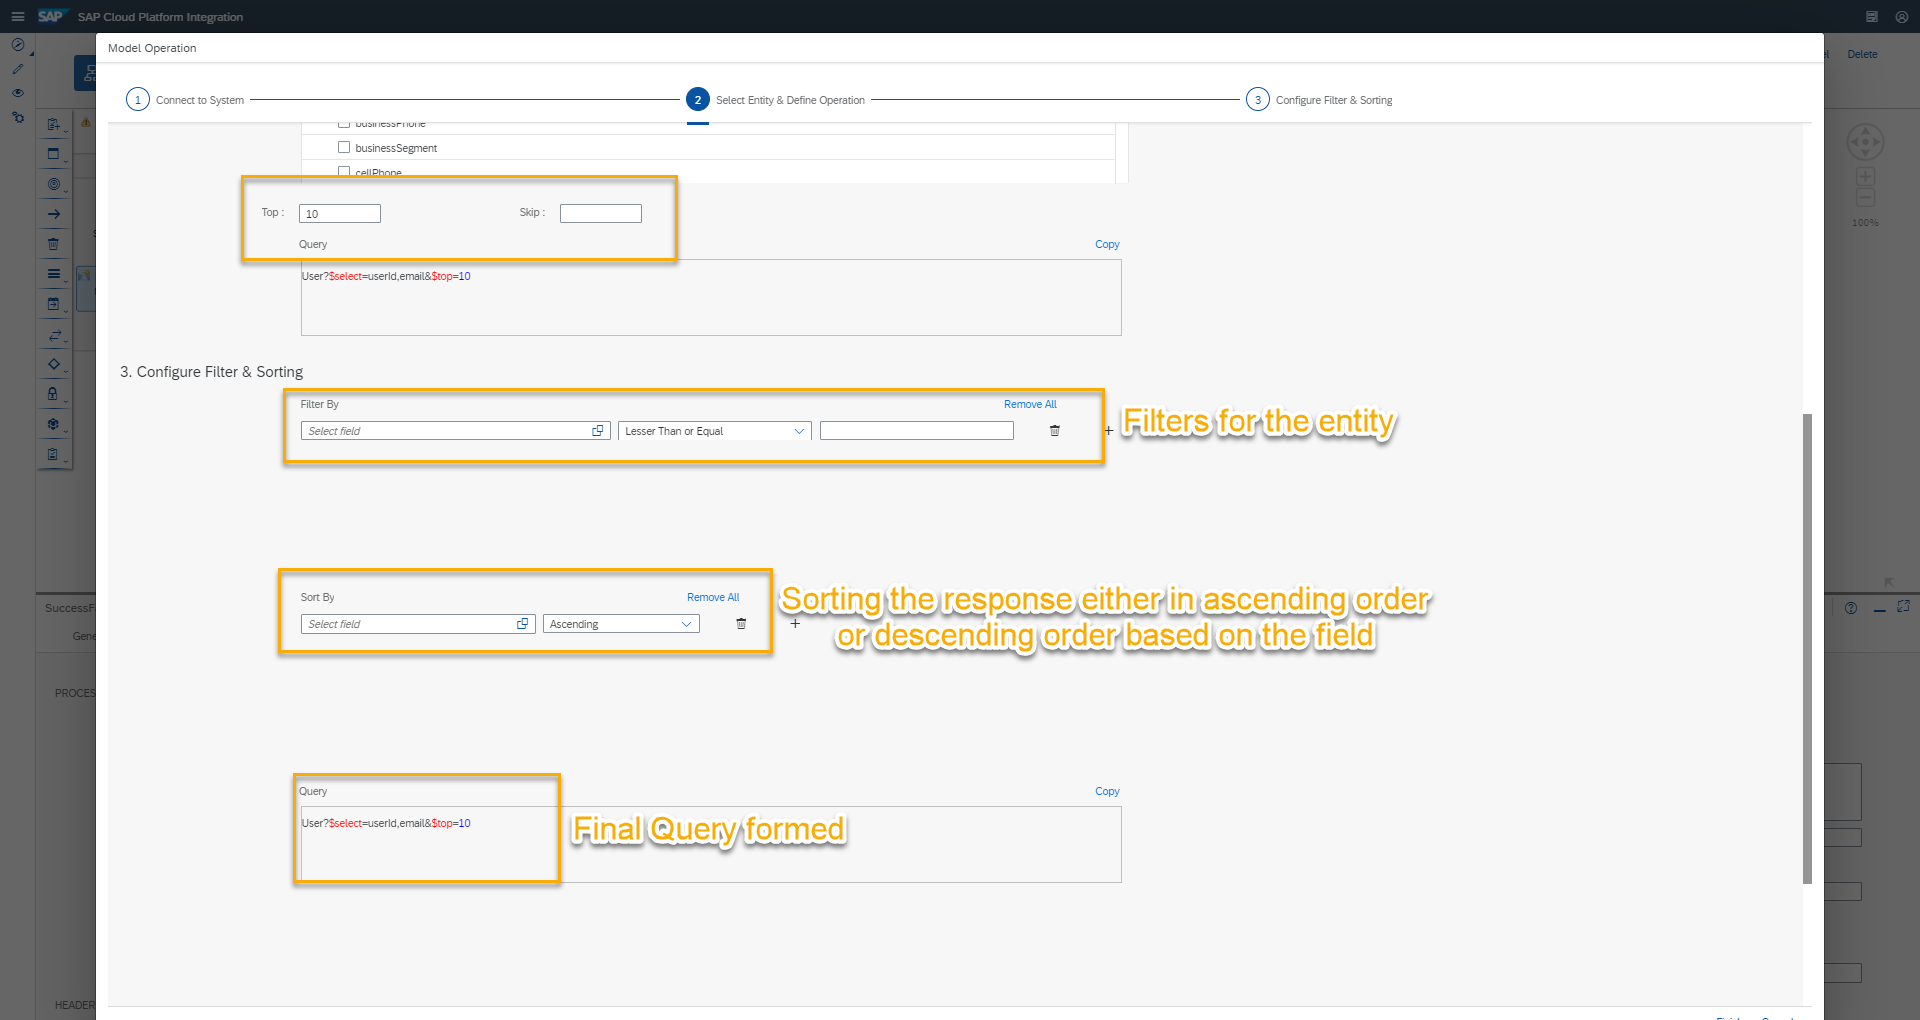
- Configure Filter and Sorting: Filter and Sorting parameter are defined to form final query that needs to be executed from SAP CPI to fetch the data from SuccessFactors.
Finally Deploy the IFlow to get required data from SuccessFactors and can be seen using Monitoring tail of SAP CPI.
Leave A Comment?
You must be logged in to post a comment.