This post is a step-by-step configuration guide and it will help you to understand the steps and specifics to configure MS ADFS 3.0 (Microsoft Active Directory 3.0) as Identity Provider (IdP) for SAP HANA Cloud Platform (SAP HCP).
In this post, you see how to enable the MS ADFS 3.0 as IdP for your applications in SAP HCP.
1. How it Works
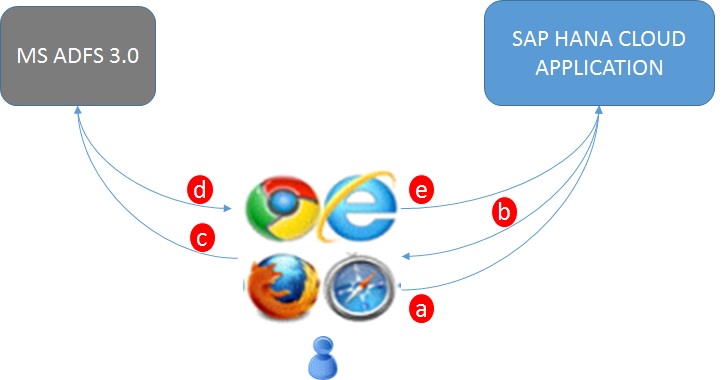
By default, SAP HCP uses SAP ID Service as identity provider based on SAML 2.0. In addition, SAP HCP supports identity federation and single sign-on with external identity providers. In this case, we will the focus on MS ADFS 3.0 as external IdP for SAP HCP. It means we will configure SAP HCP to authenticate users on MS ADFS 3.0, instead of SAP ID Service. The following steps can describe the authentication process in a simple way:
a. User requests access to an application on SAP HCP thru the browser.
b. SAP HCP request user authentication on MS ADFS.
c. User authenticates on MS ADFS.
d. The user receives a redirect to SAP HCP and holds a SAML 2.0 Assertion in order to access the application.
e. User get access to the application
2. Prerequisites
Below you find a list of the prerequisites:
a. An SAP HCP account (In my case, I’m using an SAP HCP trial account).
b. SAP MS ADFS 3.0 configured and working with SAML 2.0.
c. IoT service enabled on SAP HCP. (If you don’t know how to do it, please follow this link).
Note: As you can see, the installation of MS ADFS 3.0 is not a subject of this blog.
3. Gettting Metadata File From MS ADFS 3.0
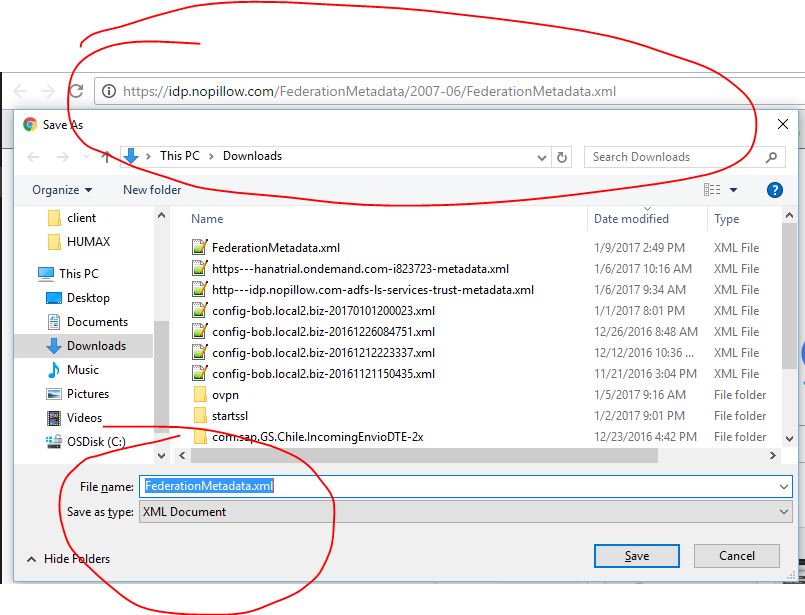
Before starting the SAP HCP configuration, I really recommend you to get the metadata XML file from MS ADFS. The metadata file contains information about certificates, URLs, algorithms and so on, which are required to configure the Federation between SAP HCP and MS ADFS.
The MS ADFS 3.0 provides an URL where you can access and download the Metadata; It has the following structure: https://<HOST FQDN>/FederationMetadata/2007-06/FederationMetadata.xml, of course you need to replace the <HOST FQN> with the full-qualified name of your ADFS server.
4. SAP HCP Configuration.
4.1 Creating a Trusted Identity Provider
Let’s work! Now you have all you need to configure your SAP HCP to work with MS ADFS as IdP, therefore follow the instructions below:
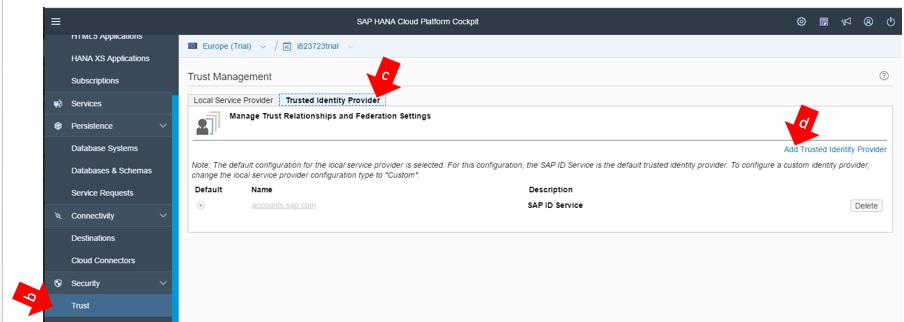
a) Go to SAP HCP Cockpit.
b) On the menu, click on “Trust”.
c) Click on folder “Trusted Identity Provider”.
d) Click on link “Add Trusted Identity Provider”.
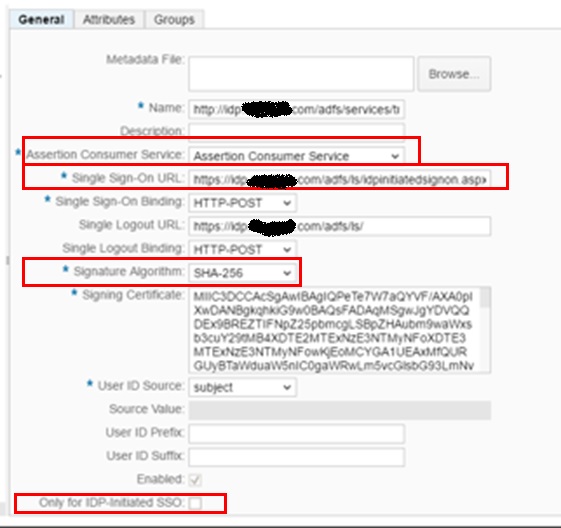
It’s time to import the Metadata file from MS ADFS on SAP HCP. In the folder “General”, click on Button “Browse” and import the FederationMetadata.xml file. The fields will be automatically populated with the data from the metadata file, but you need to fix some fields, see the instructions below:
a) Setup Assertion Consumer Service from Application Root to Assertion Consumer Service
b) Change the SSO URL to https://<ADFS FQDN>/adfs/ls/idpinitiatedsignon.aspx?logintoRP=https://hanatrial.ondemand.com/<YOUR ACCOUNT USER>
Example:
ADFS FQDN = idp.example.com
SAP HCP Account User: p1942090147
https://idp.example.com/adfs/ls/idpinitiatedsignon.aspx?logintoRP=https://hanatrial.ondemand.com/p1942090147
c) Change the Signature algorithm from SHA-1 to SHA-256
d) Leave the option “Only for IDP-Initiated SSO” unchecked.
4.2 Rebuilding the Local Provider Configuration
The local provider needs to be recreated in a custom way. In other words, you need to rebuild the local provider in order to get the metadata file from SAP HCP.
In this case, we will perform a simple rebuild of the local provider. Follow the instructions below:
a) In the Menu “Trust”, click on folder “Local Service Provider”
b) Click on button “Edit”
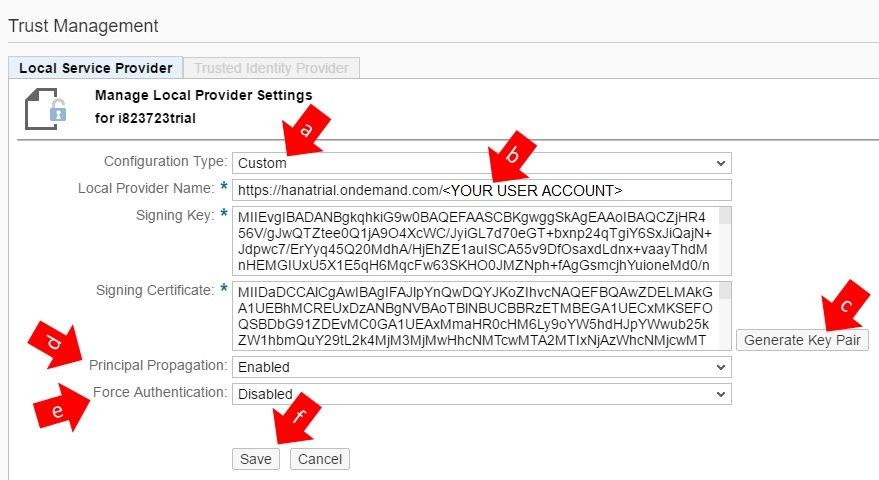
Follow the instructions below in order to setup a new local provider:
a) Change configuration type to “CUSTOM”
b) Fill the “Local Provider Name” with a URL based on the following rule:
https://<HANA FQDN>/<YOUR USER ACCOUNT>
Example: https://hanatrial.ondemand.com/p1942090147
c) Click on button “Generate Key Pair” in order to create new keys for signing and the certificate.
d) Enable Principal Propagation
e) Disable the option “Force Authentication”
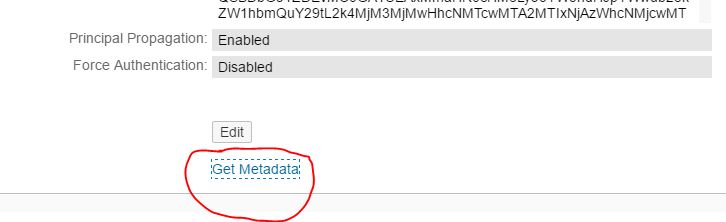
4.3 Getting Metadata File from SAP HCP
Once you have created a custom configuration for a local provider then you can perform this step.
An option to get the Metadata file will be available after you save the custom configuration for “Local Service Provider”. Therefore, click on link “Get Metadata” and save the file.
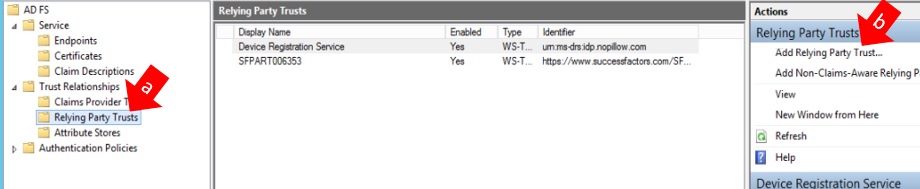
4.3 Create a Relying Party Trust
Creating a relaying party trust on MS ADFS 3.0 is easy, but you need to pay attention for each step presented here.
a) Open MS ADFS Management and expand three menu up to “Relying Party Trusts”.
b) Click on “Add Relying Party Trust”
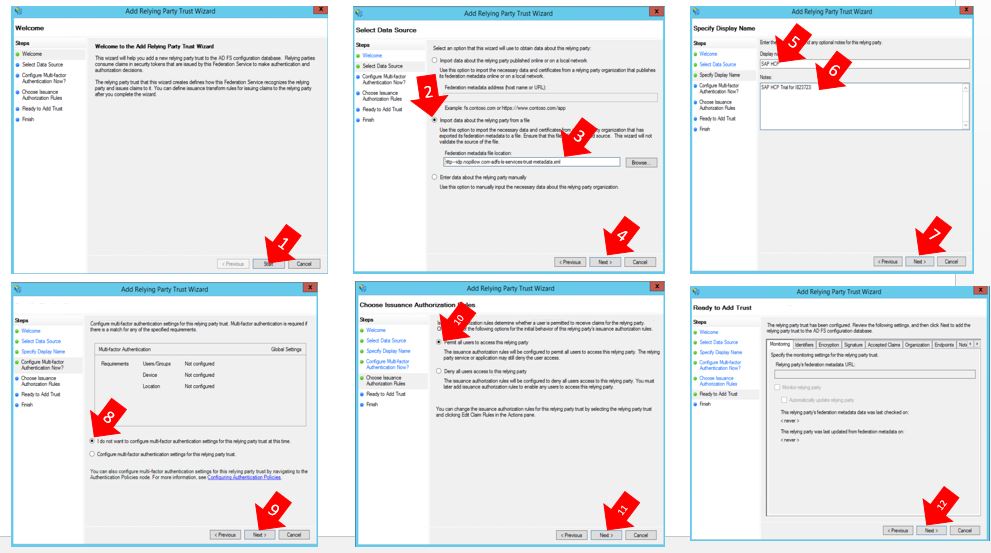
Configure a new Relying Party Trust in thirty clicks on fourteen screenshots;
1) Click on next
2) Select “Import data about the relying party from a file”. Do you remember the Metadata file you save in top 3.3? You need it now.
3) Click on “Browse” and select the Metadata file you saved.
4) Click on Next.
5) Give a name, for example SAP HCP
6) Enter a description.
7) Click on Next
8) Select “I don’t want to configure multi-factor authentication setting for this relying party trust at this time”.
9) Click on “Next”.
10) Select “Permit all users to access this relying party trust”.
11) Click on button “Next”.
12) Just perform a click on “Next”.
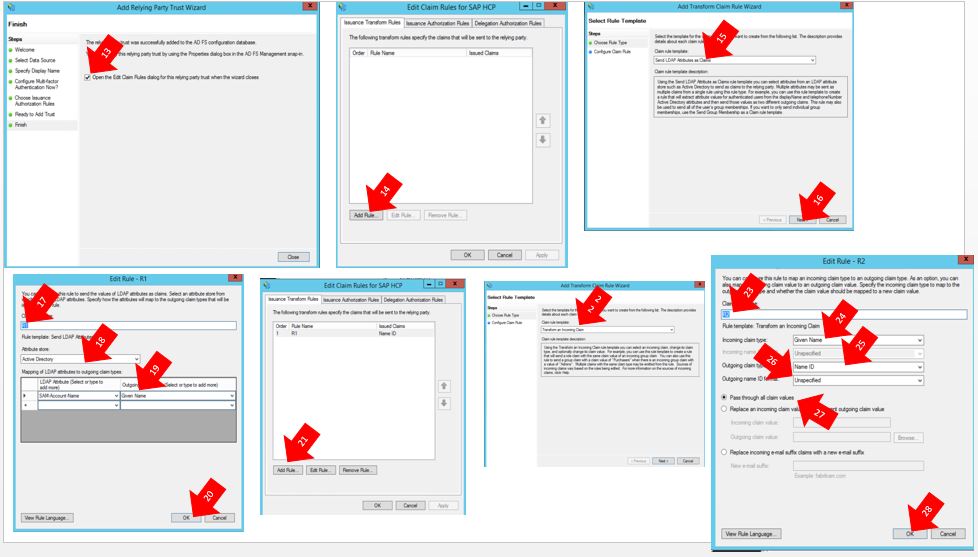
13) Check the box “Open the Edit Claim Rules dialog for this relying party trust when the wizard closes”.
14) Click on “Add Rule”.
15) Select “Send LDAP Attributes as Claims” for Claim Rule Template.
16) Click on Next.
17) Give a name for the rule, in this case I gave “R1”.
18) Choose Active Directory for Attribute store option.
19) Mapping Attribute: “SAM-ACCOUNT-NAME” to “Given Name”
20) Click on Next.
21) Click on “Add Rule”.
22) Select “Transform Incoming Claim” for for Claim Rule Template.
23) Give a name for the rule, in this case I gave “R2”.
24) Choose “Given Name” for Incoming Claim Type.
25) Choose “Name ID” for Outgoing Claim Type.
26) Choose “Unspecified” for Outgoing Name ID format
27) Select: Pass through all claim values
28) Click on “Next”.
29) Click on “Apply”
30) Click on “Ok”.
The screenshots with steps:
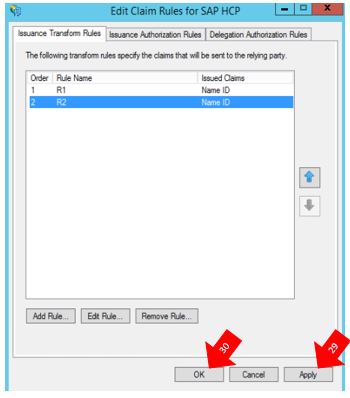
Done! Just close ADFS Management.
4.5 Mapping Users
At this point we will create a mapping for all users, the users exists only in MS ADFS. You don’t need to create users in SAP HCP, but you need to create groups to give access to your Applications. In this case, we will create a group and link it to IdP (MS ADFS).
4.5.1 Create a Group
Go back to SAP HANA Cloud Platform Cockpit and perform the following activities:
a) Click on “Authorizations” in the right side of the screen.
b) Click on folder “Groups”.
c) Click on “New Group”

d) Give a name to the group. In my case I used “demo-sso”.
e) Give the following role to the group “demo-sso!.
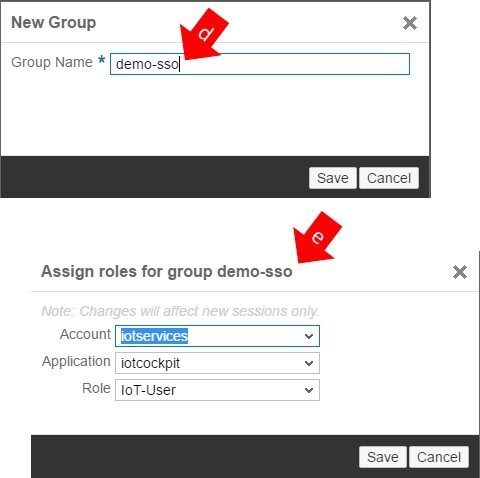
Note: Do not forget to click on button “Save”.
4.5.2. Mapping Group to IdP
Perform the following tasks:
a) On the SAP HANA Cloud Cockpit, click on menu “Trust”.
b) Click on folder “Trusted Identiity Provider”.
c) Click on IdP name.
d) Click on folder “Groups”.
e) Select the group you’ve created.
f) Click on “Save”.
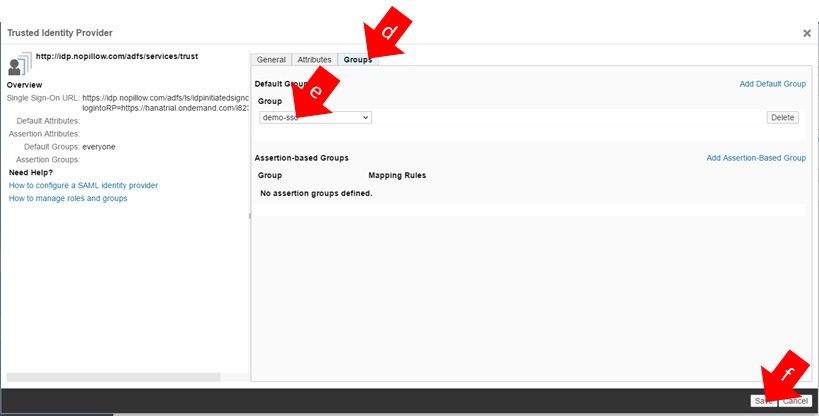
You can create access for specific group, for example, you can combine groups and permission and map these groups adding assertion-based group. But it is a subject for another blog.
At this time, the users can access the IoT Cockpit with SAML 2.0.
4.5.3 Test
a) Ensure that IoT Cockpit is activate in your instance.
b) Ensure that you got the URL for Iot Cockpit of your instance.
c) Open the browser in a private mode. It is just to confirm that a identity will be required.
d) Activate the developer tools; Press F12 in Google Chrome and click on Network and check the Preserve Log box.
e) Enter the link of the IoT Cockpit, see the example:
https://iotcockpitiotservices-p1941111trial.hanatrial.ondemand.com/com.sap.iotservices.cockpit/
Lets understand, see my screenshots below:
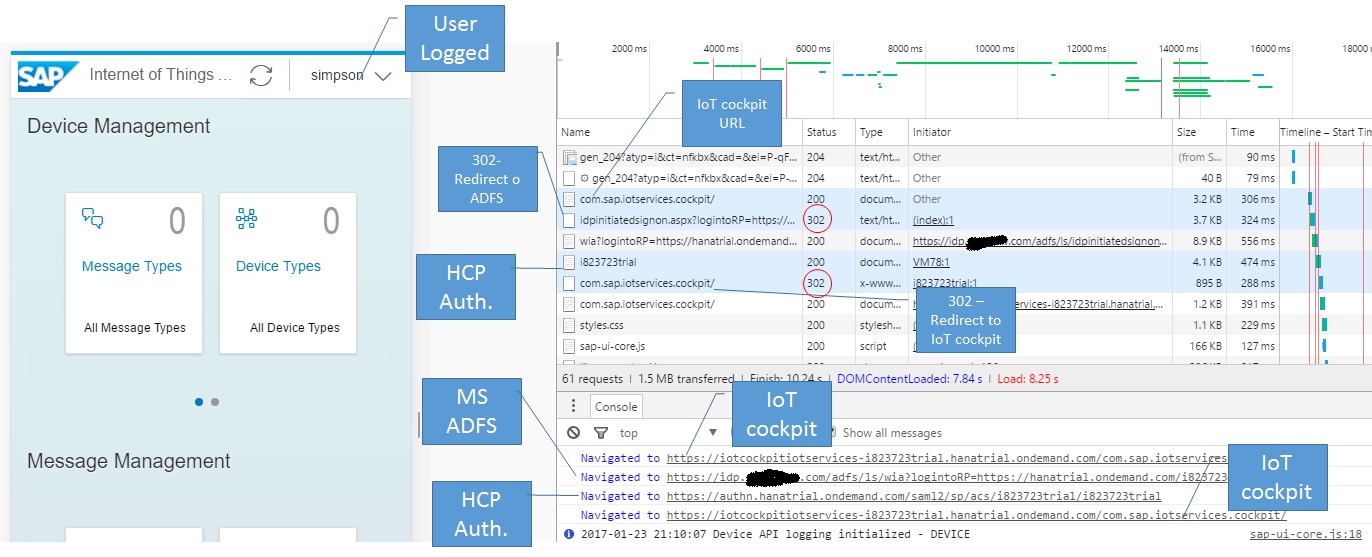
The user is “simpson” (SAM-Account name on Active Directory).
Following the Browser’s sequence:
- User open his browser and put the IoT URL.
- User’s browser receives an redirect the user to MS ADFS login URL.
- The user is logged on Windows Network and has a Kerberos ticket, therefore the user gets a SAML 2.0 assertion from MS ADFS and User’s browser moves to SAP HCP Authentication endpoint.
- User authenticates on SAP HCP with their SAML 2.0 Assertion and receives an redirect to the IoT Cockpit.
Remember you do not need to create the users on HCP, you just need to create groups and give the access.
Leave A Comment?
You must be logged in to post a comment.