Hello Everyone,
I would like to share a few quite useful SAP HCM features with you,
In this blog post, we will be focusing on the subject of defaulting values of certain infotype fields by using HCM features.
Please use PE03 transaction to reach features initial screen. See below figure :
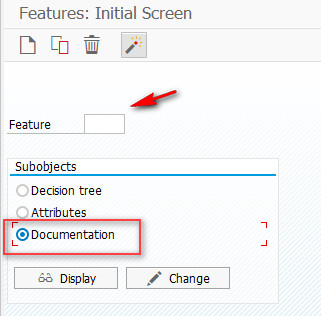
Features: initial screen
By just writing the name of feature you can easily find the related documentation about particular feature.
So, after short introduction lets get start. I am going to share 5 commonly used HCM feature’s functionality today
- ABKRS
This feature allows you to obtain the default value for the payroll
area. Payroll area is one of the standart field in the infotype 0001 ( Organizational Assignment).

Organizational Assignmet Infotype
Let’s first take a look “ABKRS” attributes, by checking this we will be able to know which parameters can be used for decision. According your customer requirement with the help of valid decision parameters you will be structuring “ABKRS” feature.
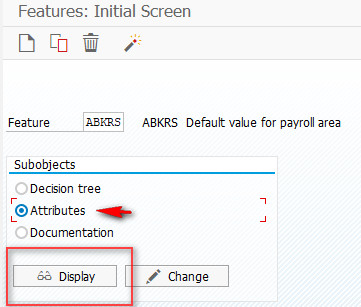
Feature Attributes
After click on “display” button you wil encounter with following screen;
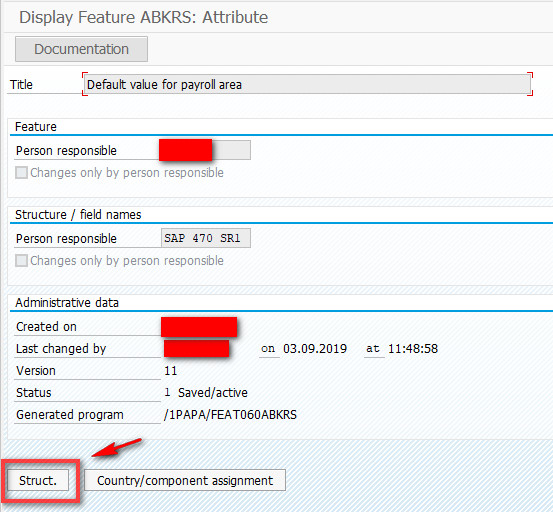
Then we will click on ” Struct” button;
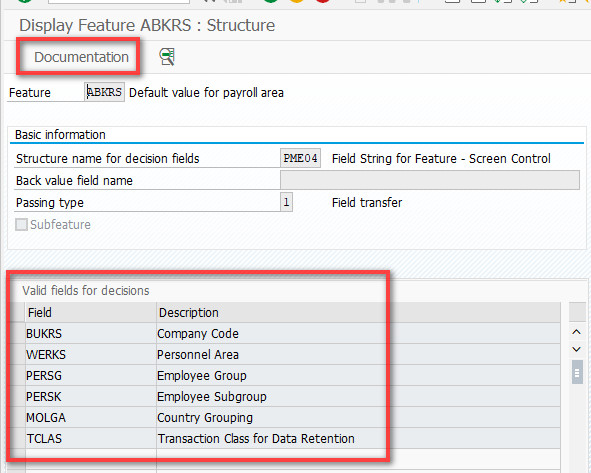
ABKRS Structure
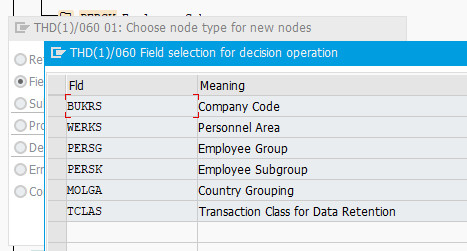
Finally we have found the valid fields for decisions. It basically means that you are able to use those parameters to structuring your decision tree of ” ABKRS” feature for your enterprise.
Let’s take a look some of the examples to understand full functionality of “ABKRS” feature.
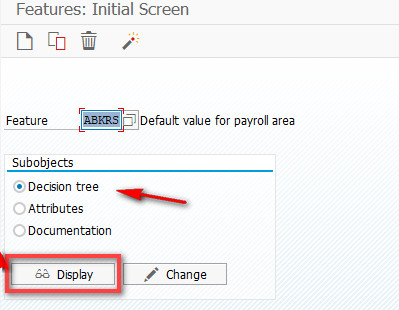
Let’s choose the decision tree radio button and click on display to see some examples;
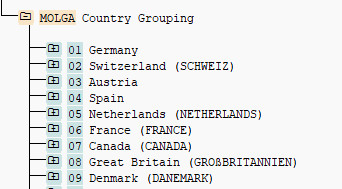
Country Grouping
Imagine you are customizing payroll for a multinational global corporation, there for it’s located in so many different countries in the world. So the best thing to do is using the “MOLGA” field for decision operation at beginning of structuring “ABKRS” feauture.
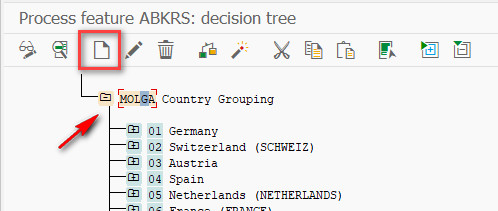
Creating Nodes Under Decision Field
Then please select the related decision field and click on “create” to define nodes which are countries under “MOLGA” grouping.

Let’s dive into details, Now it is time to define second decision field for our corporation which is located in Germany.
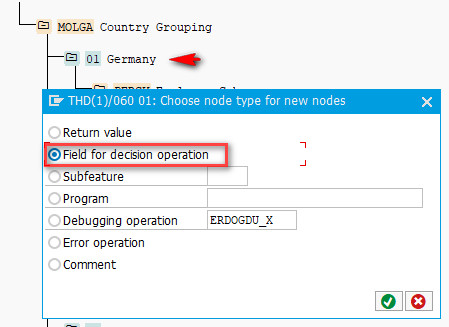
Please select “Germany” node then click “create” button on the next screen ” field for decision operations” has to be selected.
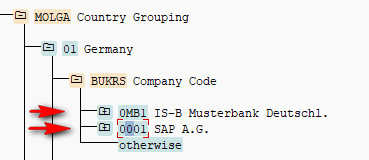
In case of you have more than one “Company Code” in related country I would always suggest you to choose “BUKRS” field for your next decision (after MOLGA). It is always good idea to start structuring SAP HCM feature with “BUKRS” because company code is the initial point of enterprises structures in SAP HCM System.
Company Codes
So two different company code has been defined. Now it’s time to structure the “ABKRS” tree according to needs of companies.

Structiring ABKRS
Starting with this point you can structure ABKRS feature according to your customer needs. As an example. “PERSK” has been defined as a next decision field.
Predefined/Customized employee groups has been defined under “PERSK” field like we did in country grouping step.
Related Employee Subgroups are ;
DN “Monthly wage earner”
DZ “Sales personnel”
ON “Industrial civ. serv.
Now let’s see how to define what arrows are showing (Return values)
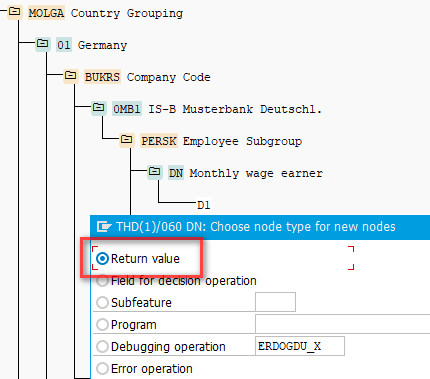
Return Value
Please select the related employee subgroup node ( for ex: DN Monthly wage earner) and click on “create” then the above screen will appear. Then “return value” should be typed.
In this case our return value is going to be predefined payroll area codes. Please see the view V_T549A for defined payroll areas for your enterprise.
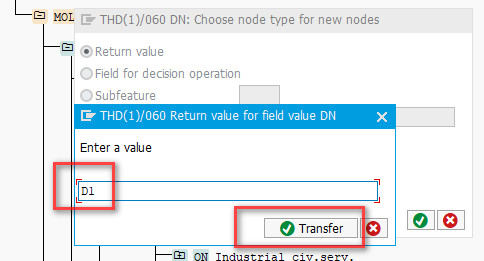
Typing Return Value
So the last version of our “ABKRS” tree structure for the company IS-B Masterbank Deutschl. in Germany is going to look like below;
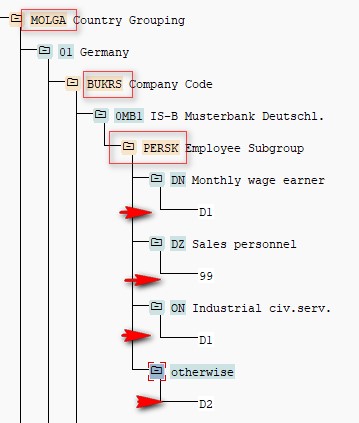
Let’s explain what does it mean basically
Example; If you hire an employee in “Germany” for the company “IS-B Musterbank Deutschl.” and the choose “Monthl wage earner” as employee subgroup for this particular employee, his payrol area will be defaulted as D1.
Example 2 : If you hire an employee in “Germany” for the company “IS-B Musterbank Deutschl.” and the choose employee subgroup for this particular employee except “DN, DZ, ON” ( it means otherwise), his payrol area will be defaulted as D2
So, let’s continue with second useful feature:
2. PINCH
With the advantage of PINCH feature you can determine the default value for the Administrator group in the Infotype 0001 (Organizational Assignment Infotype 0001)
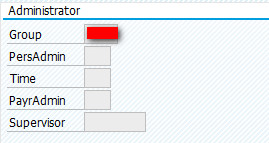
Administrator Group
What does administrator group means ? It basically means a group that combines all administrators who are responsible for one organizational area.
In the infotype Organizational assignment, three
different personnel administrators can be entered;
o administrator for PA
o administrator for TM
o administrator for PY
Three administrator groups are shown above can be defaulted into a single group using PINCH feature.
So let’s start to configure;
IMG Display
You can find the related step from “SPRO” transaction, on the other hand like the other features directly find the “PINCH” feature via “PE03” transaction:
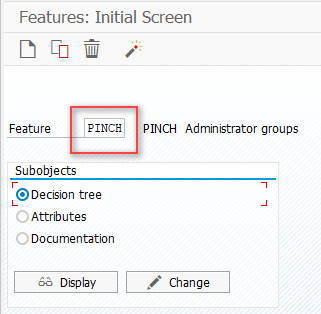
PINCH Feature
You can follow the same way like shown in “ABKRS” section for “PINCH” to find valid fields for decision. See the table below;
| FIELD | DEFINITION |
| TCLAS | Transaction Class for Data Retention |
| MOLGA | Country Grouping |
| BUKRS | Company Code |
| WERKS | Personnel Area |
| BTRTL | Personnel Subarea |
| PERSG | Employee Group |
| PERSK | Employee Subgroup |
| ABKRS | Payroll Area |
| KOSTL | Cost Center |
| JUPER | Legal Person |
| VDSK1 | Organizational Key |
| GSBER | Business Area |
| OFFID | Advertisement |
| VACID | Vacancy |
| APACT | Applicant activity type |
| SPAPL | Unsolicited application group |
So let’s take a look a few example about how to structure decision tree of “PINCH” feature:
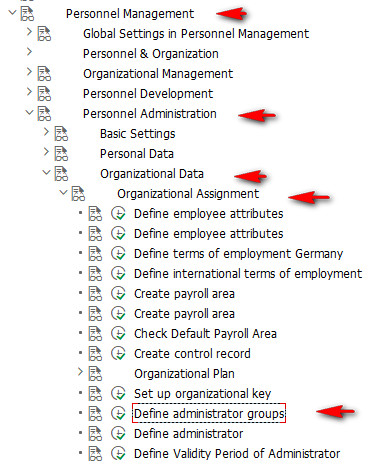
Define Administrator Groups
In this step we will determine the return value of this feature, and it is going to be 4 – character administrator group.
This return value (Administrator group) will be defaulted in the Organizational Assignment infotype (Infotype 0001).
Example;
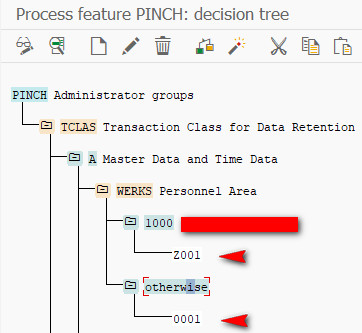
PINCH
We can see from the image that if the personnel area is “1000” administrator group will be defaulted as “Z001”, but if the personnel area is anything other than “1000” administrator group will be defaulted as “0001” in the Organizational Assignment Infotype (0001).
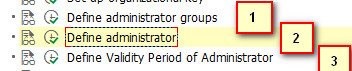
First step is completed. In other blog, I will be explaining full functionality of “Administrator Groups” and following customizing steps. See below figure;
So let’s continue the next feature;
3. SCHKZ
SCHKZ allows us to determine the default value for the WS rule in the Planned Working Time infotype (0007)
Please see the valid decision fields below;
| FIELD | DEFINITION |
| PERSK | Employee Subgroup |
| MOLGA | Country Grouping |
| BUKRS | Company Code |
| WERKS | Personnel Area |
| BTRTL | Personnel Subarea |
| PERSG | Employee Group |
According to fields above return value can be defined. This return value is the Work schedule rule that is going to be defaulted in the Planned Working Time infotype (0007).
Let’s check some examples;
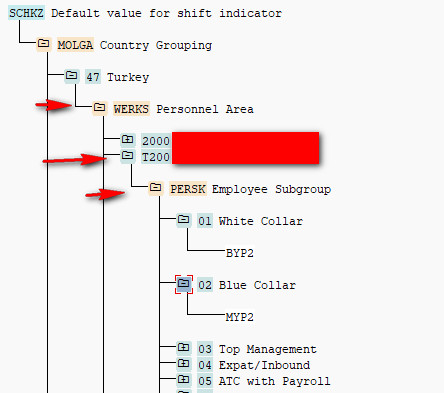
SCHKZ Decision Tree Sample
It means that, if you hire an employee for personnel area “T200” and, employee subgroup is “white collar” then the work schedule rule will be defaulted as “BYP2” on the other hand in case of “blue collar” is choosed as an employee subgroup the work schedule rule will be defaulted as “MYP2”
Let’s verify this by assuming an employee from Personal area T200 and his/her Employe Subgroup is 01 . Next picture, you can see that the Work schedule rule is defaulted to “BYP2”.
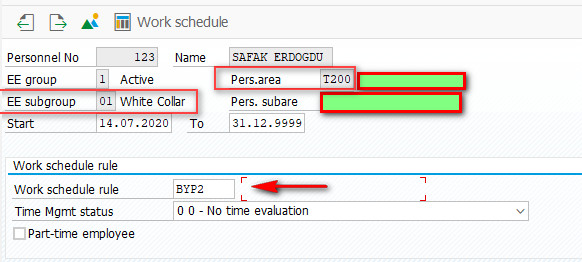
SCHKZ
So let’s move on the next feature,
4. TMSTA
TMSTA allows you to determine the default value for the Time management status in the Planned Working Time infotype (0007).
Please see the valid decision fields for the feature below;
| FIELD |
|
|
| BUKRS | Company Code | |
| WERKS | Personnel Area | |
| BTRTL | Personnel Subarea | |
| PERSG | Employee Group | |
| PERSK | Employee Subgroup | |
| MOLGA | Country Grouping |
According to fields above you can specify a return value. This return value is going to be the “time management status” that will be defaulted in the Planned Working Time infotype (Infotype 0007).
For example you can specify different different time management status based on “Personnel Area”, and go deeper differantiation by determening an additional decision field “Employee Group”. See the figure below:
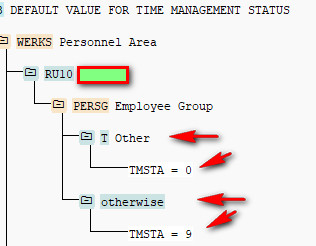
TMSTA
Let’s verify the figure above;
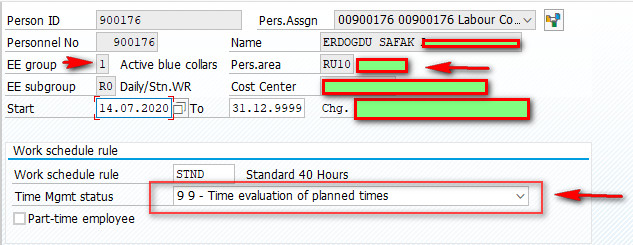
TMSTA EXAMPLE
As you can see Pers. area has been defined as RU10, and the employee group different than “T” in this case “Time Management Status” has been defaulted as “9” for this particular employee (Otherwise node activated).
Let’s continue with last feature of this blog,
5. DATAR
DATAR helps us to determine default day dypes in Date Specifications Info type ( IT0041). Please see the below figure for valid decision fields of this feature.
| FIELD | DEFINITION |
| BUKRS | Company Code |
| WERKS | Personnel Area |
| PERSG | Employee Group |
| PERSK | Employee Subgroup |
| MOLGA | Country Grouping |
The return value of the feature is a date type from table T548Y. Please see the examples for day types below;
V_T548Y
You can determine different date types based on Country Grouping as shown in the below figure.
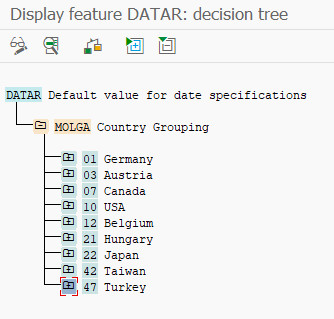
DATAR DECISION TREE
Let’s have a look more deeply to understand full functionality of the feature. Next figure you will see how the default values has been defined for the employees with country grouping 47 “Turkey”.
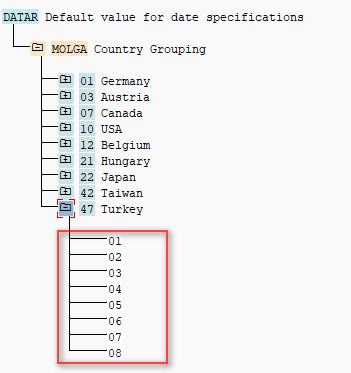
DATAR DECISION TREE
It is seen from the image that if the country grouping 47 (Turkey.) day dypes 01,02,03…. 08 will be defaulted in the Date specifications info type (IT 41)
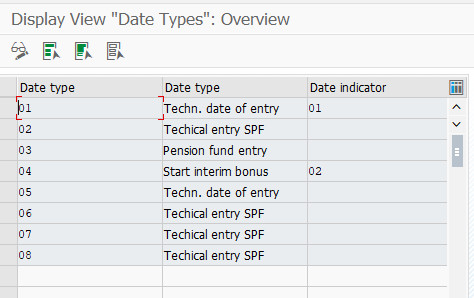
Let’s demonstrate this with an employee belonging to country grouping “47”.
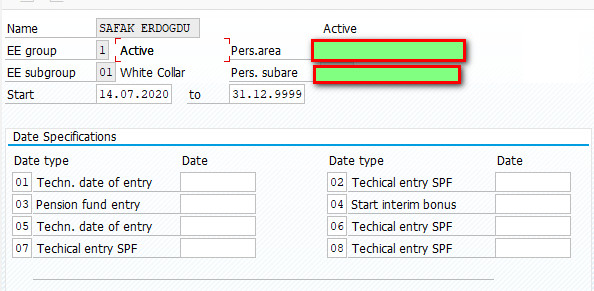
DATE SPECIFICATIONS INFO TYPE (41)
We can see from the figure that date types from 01 “Techn. date of entry” to 08 “Technical entry SPF” are defaulted according to feature “DATAR”
This feature was the last one for now !
As a result, you can effectively speed up business processes and prevent user errors by using the features. I hope this blog helps you to solve a problem during your SAP HCM implementation project, please do not hesitate to ask your further questions and fix my errors, additional knowledge is always a plus !
Leave A Comment?
You must be logged in to post a comment.