This blog will focus on the capabilities of SAP Query (a.k.a. Adhoc Query) and Creating Custom fields in infosets, with emphasis on HR Module.
Most of the reporting needs of an organization can be addressed through Adhoc Queries. For some specific requirements we will need custom ABAP reports, and to create custom fields ABAP knowledge is required.
First let’s refresh some concepts, processes and transactions involved in the process.
Infoset (Tcode: SQ02)
Here we will include all of our tables or infotypes that will provide us data for our queries. If you are trying to create queries in HR Module then it is strongly recommended to use a Logical Database to create your queries, because if you are using HR Tables then joining them will be a problem because of date fields (BEGDA/ENDDA).
Logical database will always use inner join and will skip the rows that will not match in corresponding infotypes. For example: You are trying to create a query with Pernr and name from infotype 2 and Work Address from infotype 6. Then the report will not include the persons that do not have a work address. Only employees shown on the report will be those that have a work address subtype of infotype 6 populated. This constraint is usually overlooked and it results in wrong reports.
Steps to create a new infoset using logical database PNPCE:
- Go to Transaction SQ02.
- Give Infoset a description, give source of data for infoset i.e. Logical Database or Tables etc.
- If you have used logical database e.g. PNPCE then a screen will pop-up to select the infotypes.
- Select the infotypes and continue.
- If you later want to add more infotypes then click on menu item ‘Edit’ -> ‘Change Info-Type Selection’ and add or remove the infotypes.
- If you have used tables then only give one table name and you will be brought to the screen where you can add more tables and specify joins between tables.
- To add more tables, click on ‘Join Tables’ and click on ‘Insert Tables’.
- You can drag and drop the matching field from one table to another to specify joins, you can also change the join type from inner join to outer join.
- There is an area ‘Field Group’ in infoset screen, only the fields that appear here will be available while creating queries. All fields from infotypes may not be available in field groups, so you will have to manually drag and drop them in appropriate field groups.
- On the left hand side, under each node of infotype/table you will see some fields in blank or blue text color. Blue fields are those that are included in the infoset and hence available for reporting in SQ01.
- Save and generate your infoset. This is mandatory, as when you generate the infoset, a program is generated with the code reflecting your changes in infoset.
User Groups (Tcode: SQ03)
Once you have created the infoset you have to assign it to a user group. To create a new user group go to transaction SQ03 and create a new user group and assign users to that user group. If you already have a user group then you do not need to go to SQ03, on the main screen of SQ02 you can click on button ‘Role/User Group Assignment’ to specify the user groups tied to that infoset.
Ad-hoc Queries (Tcode: SQ01)
Ad-hoc queries (a.k.a. SAP Queries) are used for reporting off the infoset created in previous steps. So go to transaction SQ01 and create a new query:
- Give name of the query you want to create and hit create button.
- You will be asked the name of the infoset that you want to use.
NOTE: You cannot change the infoset later, so be sure which infoset you want to choose, otherwise you will have to create a new query to choose a different infoset.
- There will be various options on next screen regarding output format, title etc. which are pretty self explanatory and we will not go into details of them.
- A faster way will be to click on ‘Basic List’ button.
- Expand the infotype in which you are interested.
- You will see two check boxes in front of each field.
- First box is to display the field on the report.
- Second box is to display the field on the selection screen to restrict the records based on some criteria.
- Fields will by default have same order in which you select them. It can be changed visa dragging and dropping on appropriate location in right hand pane.
- Each infotype will have ‘Additional Fields’ node which contains the texts for codes like for Position, it will contain a field text:position which will display the STEXT for that position.
- Save and Run your report.
Creating Custom Fields:
Now, we will come back from refreshing memories of creating queries and jump into a little technical area.
We can create fields that will fetch data according to out own logic, fields that are not provided by SAP. For that, you will need ABAP access to the system, so if you are working in Production or Quality system then most probably you will not have authorization for that. If you need custom development then best place is the Development environment. We can then either transport the infoset from Development to next systems or we can download and upload it in production (which will again need production system to be opened for some time).
To create a custom field:
- Go to your infoset in SQ02 in change mode.
- Right click on the ‘Additional fields’ node of the infotype in which you want to create the new custom field and click create.
- Give it a name; this will be the name of the field used inside the ABAP code. Select ‘Additional Field’ and click continue.
- On next screen, provide following information.
- Long Text: This text will appear in the infoset for that field, and inside the SQ01 query while developing.
- Header text: This text will appear on top of the field as header, when the report will be in run mode.
- Format: Give the technical information about your field or simply give the LIKE reference e.g. P0002-VORNA, it will pick up the attributes from that field.
- Sequence of code: This number will be sequence of the code to be executed inside that field group. E.g. if you have created 5 custom fields and you want one field’s code to be executed before some other field so that some variables are set-up then give the appropriate sequence.
- Assign this newly created field to the field group, so that it can be accessed in reports.
- Right click the newly created field and click ‘Field Code’.
- This is the place where you will put all your code.
- If you have used Logical Database then appropriate structures will be filled in automatically (e.g. P0002, P0006 etc.) you can use same macros as you will use in your normal HR Programs.
- Once done with the logic, assign the value to the field name, so that it appears in the query.
- This code will be executed for each pernr.
- Save and generate the infoset.
Tips:
- If you are working on custom fields in infoset and have opened a query in another session then the changes in custom fields will not be seen in that query. You need to generate the query again, go to tcode SQ01, select the query, go to menu option ‘Query -> More Functions -> Generate Program’, then go out of SQ01 transaction and then come back to SQ01 and select your query
- If you have changed the data types of custom field in infoset then you need to ‘Adjust’ the query, it is easy, again come out of SQ01 and then go back, it will automatically ask for updating the new changes. Click on ‘Automatically Adjust’ check box next to each field and update the query. Otherwise you can go to menu option ‘Query -> More Functions -> Adjust’.
Local Fields:
Local Fields are used in queries, if you already have your infoset developed and want to include some simple logic then Local Fields can be useful. They are usually a calculation on another field, like for example if you want to add a field for membership status depending on field Age (Assuming you already have a field Age in your infoset, or Age is another calculated local field).
We want a field that will return values based on following logic:
If Age is less than 21, then return ‘Junior’.
If Age is between 21 and 65, then return ‘Adult’.
If Age is more than 65, then return ‘Senior’.
Go to menu item ‘Edit -> Local Field -> Create’
Field Label will be visible inside SQ01 query creation so we can say it is for SAP HR Person who will be creating or modifying the query, and Field Heading will be visible at the top of the field when the query output is displayed i.e. it is for end user.
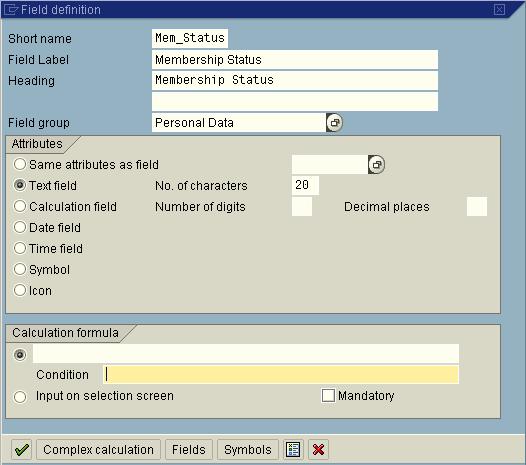
You will find rest of the items on the above screen pretty self explanatory, click on ‘Complex Calculation’ (there is nothing complex here, do not worry).
Here is a screenshot on how to use the Complex Calculation screen:
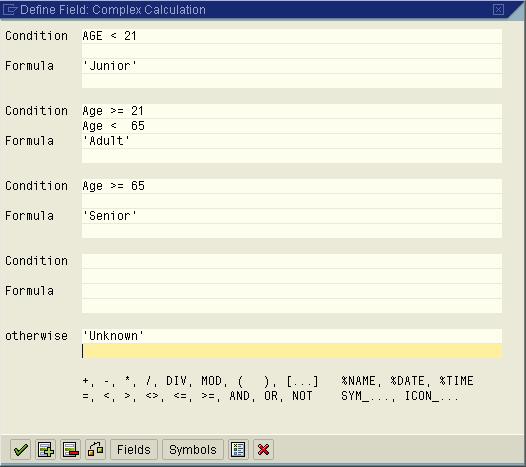
If you want to add more conditions then play with + and – icons on the above screen. And, you are done with creating local field.
Report Assignment:
A very very interesting area that is mostly ignored and has a great potential for interactive reporting. To use this feature, go to menu item ‘Goto -> Report Assignment’.
Lets say we are developing a simple report in HR, that displays Personnal Number, First Name and Last Name. Your report lists a lot of record and you want the user to have power to double click on any employee row and then open up the details in PA20. Isn’t that fascinating?
Another example would be that when a user double click a query row, the data of that employee is passed to an ABAP Program and that triggers some interface or whatever is coded in that program.
Report Assignment is in fact making the reports interactive. SAP provides various options for that. It will take many pages to go through all of them, for the sake of understanding we will go through the simplest of them.
Goto menu item ‘Goto -> Report Assignment’.
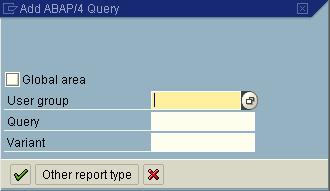
Click on ‘Other report type’ and you will see the available options. Here are the actions that can be done when user double clicks the row:
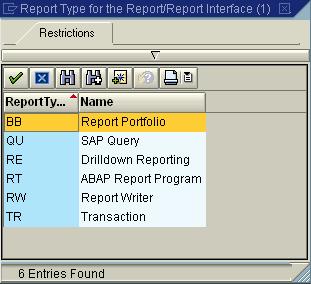
Select ‘Transaction’, on next screen you will be asked to enter the TCODE.
![]()
Save the program, and run the report. And, double click on any person’s record and you will be brought to transaction PA20 with that person’s data populated on the screen. You can also choose to go to PA30 so that user can change the data quickly.
Leave A Comment?
You must be logged in to post a comment.