Introduction:
This Blog is about to set the delimit button for custom table. Before doing that I will explain about the delimit functionality and when we will use this concept.
We generally use this concept in any module as per their business requirements in SAP. If they want to see/track the business data into single custom table. Then we will enable the delimit button of particular custom table.
For example we can see it in SAP HR/HCM module. Because this module contains date fields like Start date(BEGDA) and End date(ENDDA) for any type of Object( Like Organizational Unit, Employee Number, Position, Job, Cost Centre, etc..).
Delimit:
It means it is ending the end date or update the end date of a existing record with the given date and create a NEW record by coping the original record with start date is given date + 1 and new data.
It just divides the time span of particular record into n. no of time intervals in order to bring the end date of initial record to forward. We can also refer this as time-sliced data.
I will give a example on this:
For Ex: Before Delimiting the record:
| User | Start Date | End date | Plan |
| 123 | 01-01-2020 | 12-31-9999 | 1 |
After Delimiting the record to 07-01-2020:
| User | Start Date | End date | Plan |
| 123 | 01-01-2020 | 06-30-2020 | 1 |
| 123 | 07-01-2020 | 12-31-9999 | 2 |
Pre-requisites: In order to delimit the custom table, please follow the below mentioned points.
- The table must contain two fields for the start and end dates. One of these fields (END DATE) must be key and the other must be the first non-key field (START DATE) in the table.
- Table should Implement the TMG( Table Maintenance Generator).
Steps to set the delimit button in Custom table
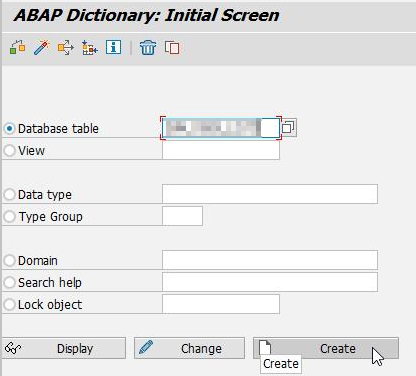
Step 1: Go to se11 and provide the required table name and click on create button.
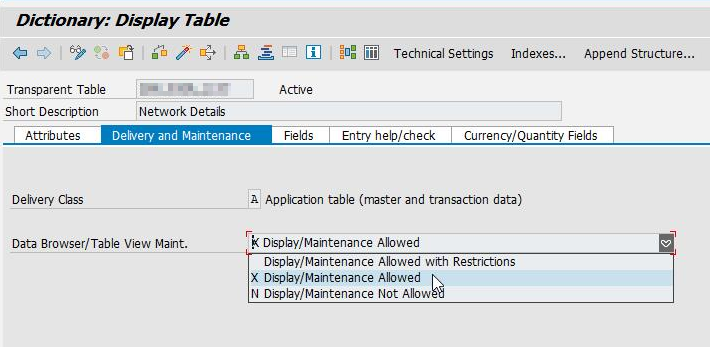
Step 2: Provide the Delivery Class as ‘A’ and Data Browser as ‘Display/Maintenance Allowed’ in Delivery and Maintenance Tab.
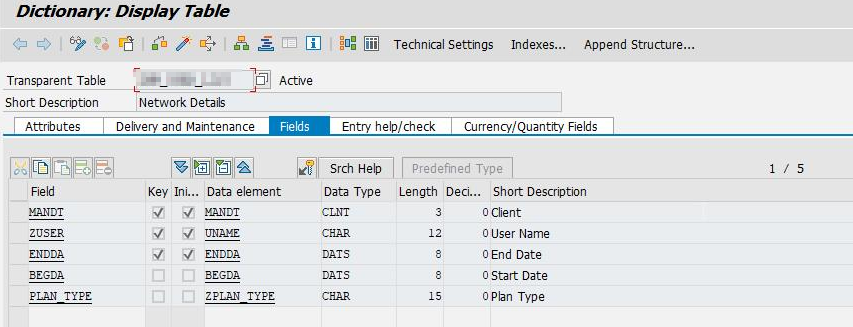
Step 3: Now go to Fields Tab and provide the required fields and make ENDDATE as key field as shown in below screenshot.
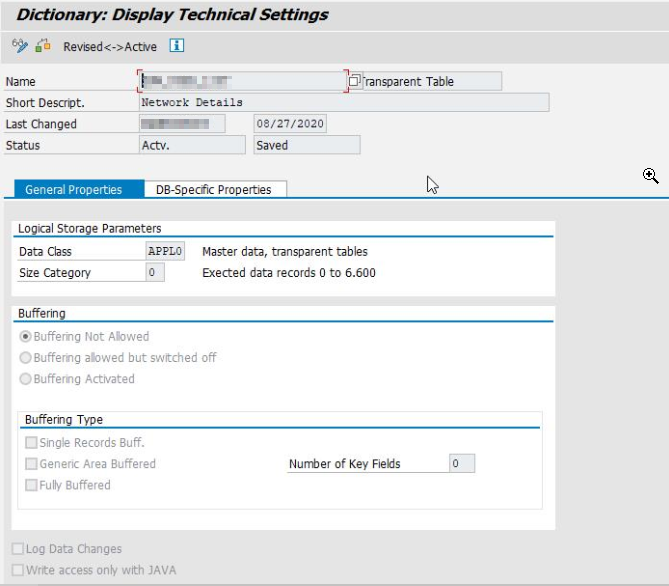
Step 4: Now click on technical settings and provide the required data and click on save as shown in below screen shot.
Step 5: Now click on extras menu->Enhancement category and select the radio button as ‘can be enhanced’ as shown in below screen shot.
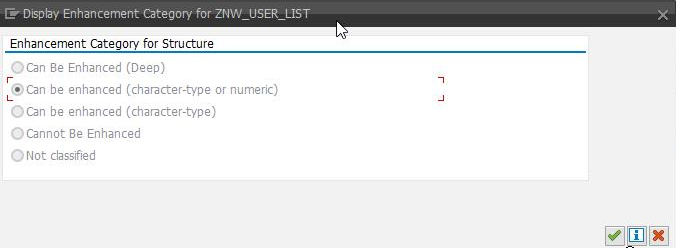
Click on save and activate it.
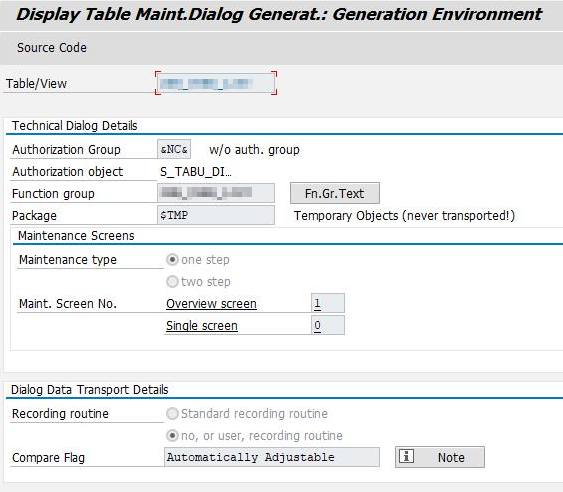
Step 6: After table creation, generate a table maintenance generator.
Go to utilities menu->table maintenance generator and provide the required data as shown in below screen shot.
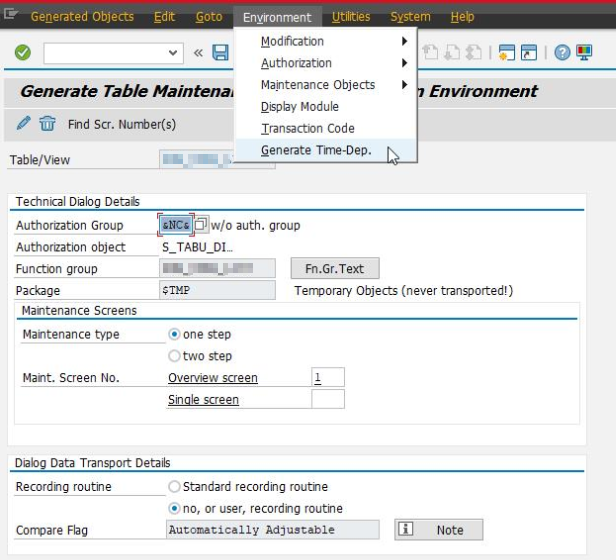
Step 7: Now go to Environment->Click on Generate Time-Dep. and save & activate it.
Note- For Delimit functionality the Generate Time-Dependency must be generated while creating the Table Maintenance Generator.
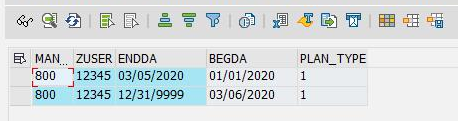
Step 8: Now the table is created and we can check the delimit button is enabled or not in SM30.
Now go to SM30, select any existing record and click on delimit button.
Note – without selecting the record the delimit button should not work.
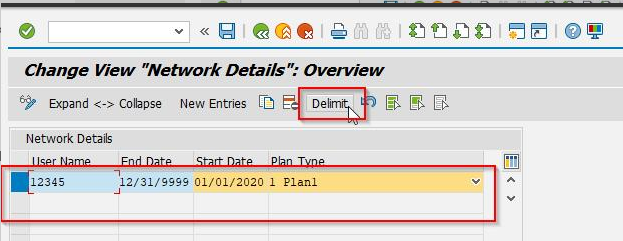
Step 9: Provide the Start Date as ’03/05/2020′.
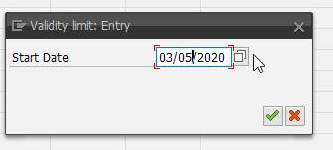
Step 10: Now check the record in the table. The record is successfully delimited and delimit button is working as shown in below screen shot.
Output:
Steps to achieve the delimit functionality using code:
Step 1: Now we can achieve this delimit functionality by using report. Below is the code used for Delimit functionality.
Note – For Delimit functionality the above table creation requirements should be same, then only we can delimit the record using code.
**__ Data declarations
DATA: wa_user_data TYPE znw_user_list,
lv_date TYPE endda.

**__ Selection screen
PARAMETERS: p_user TYPE sy-uname,
p_date TYPE sy-datum,
p_plan TYPE zplan_type.

**__ Get the existing data for the given user in selection screen
SELECT SINGLE * FROM znw_user_list
INTO wa_user_data
WHERE zuser EQ p_user
AND endda GE sy-datum
AND begda LE sy-datum.

**__ Check the existing data of the given user
IF wa_user_data IS NOT INITIAL.
lv_date = wa_user_data-endda.
UPDATE znw_user_list
SET endda = p_date
WHERE zuser = wa_user_data-zuser
AND endda = wa_user_data-endda.
IF sy-subrc EQ 0.

**__ Populate the given data in selection screen
wa_user_data-begda = p_date + 1.
wa_user_data-endda = lv_date.
wa_user_data-plan_type = p_plan.

**__ Modify the Custom table with the populated data
MODIFY znw_user_list FROM wa_user_data.
IF sy-subrc EQ 0.
WRITE: 'Custom table is updated sucessfully'.
ENDIF.
ENDIF.
ENDIF.
Now save and activate it, then click on execute.
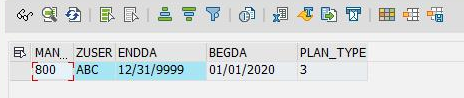
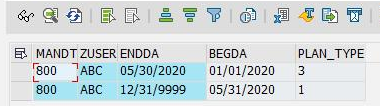
Before changing the data check the data in custom table.
Provide the required data and click on execute.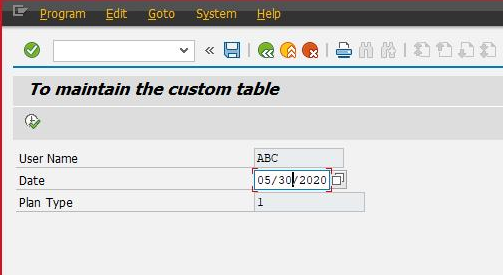
By clicking on execute, the record is delimited successfully.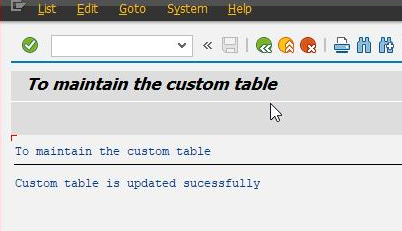
Now check the record in table. The record is delimited successfully.
Output:
Finally we achieved it, we can set a Delimit button in custom table and using the code we can delimit the required records.
The summary of this blog is Delimit functionality is used to maintain/Store a history of records for the particular object like Organizational Unit, Employee Number, Position, Job, Cost Centre, etc..).
Hope this blog might help you, once we set the delimit button in custom table, we can achieve this functionality through TMG or code.
Leave A Comment?
You must be logged in to post a comment.